


Autonomous Robot
Personal AI Robot — The DIY guide for a weekend build
AI is the brain — it can think, but it needs a body. After the 2-GPU, 4-GPU, and 8-GPU builds, we built a mobile robot for the weekend: Kobuki base, Raspberry Pi 5, RPLidar, Orbbec Astra, running ROS 2 Jazzy on Ubuntu 24.04. Full parts walkthrough, assembly, and the gotchas.
.webp)
After the 2-GPU, 4-GPU, and 8-GPU builds were shipped, we asked ourselves the same question: what's next? AI is the brain. It can think, but it also needs a body. So this post pulls the missing pieces together as a little project for the weekend — Kobuki base, Raspberry Pi 5, RPLidar, Orbbec Astra, all running ROS 2 Jazzy on Ubuntu 24.04.
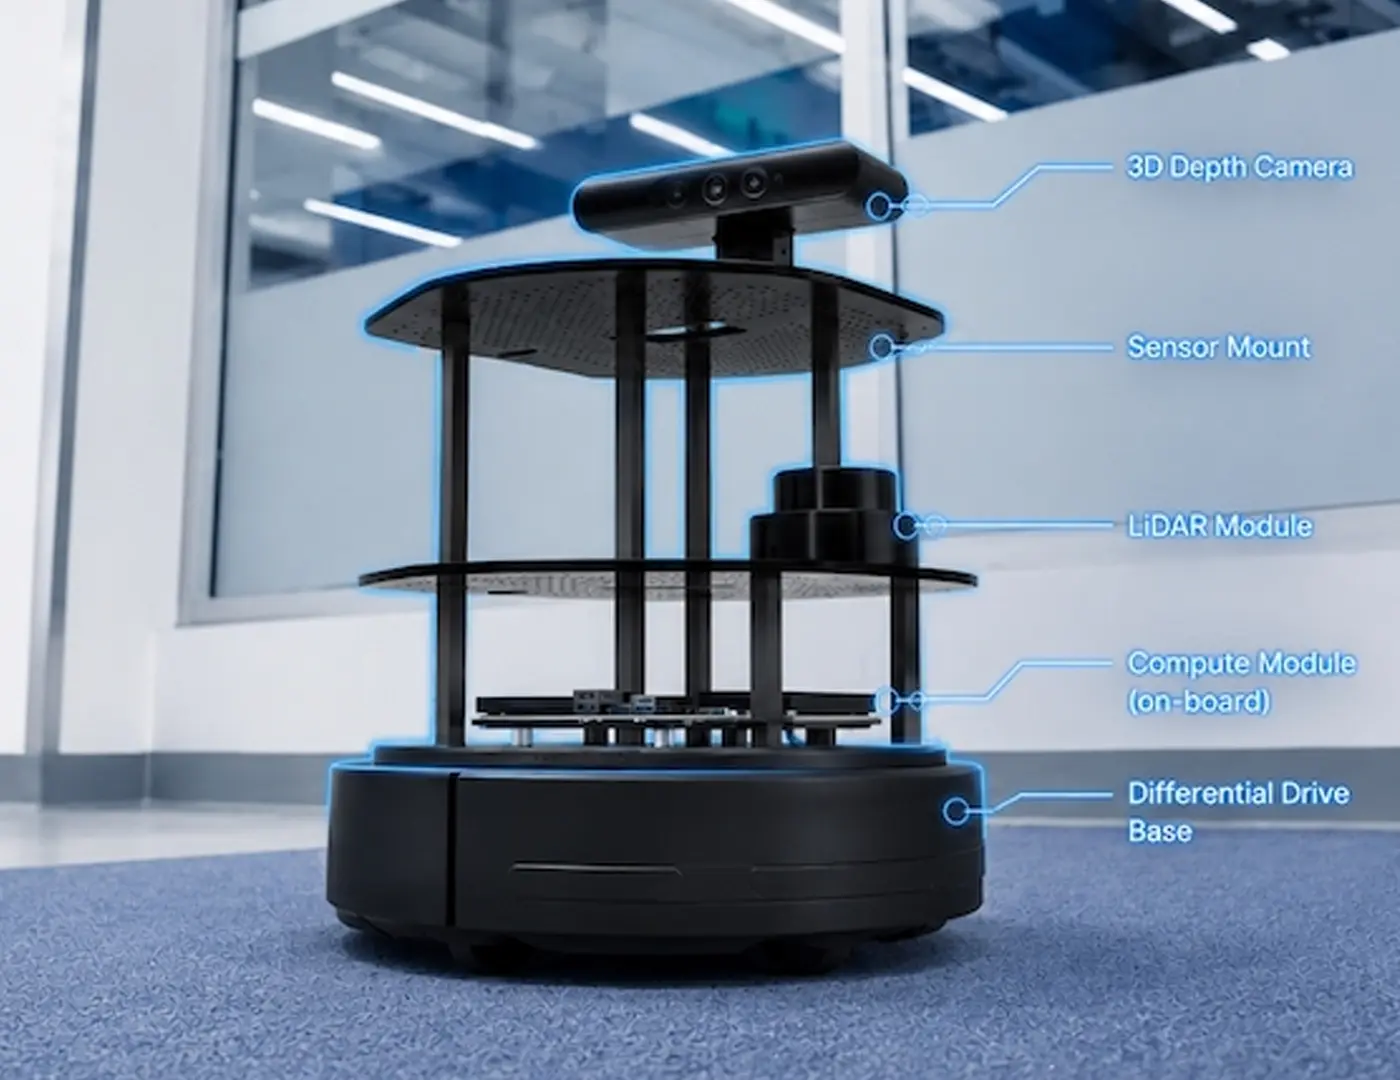
Additional Components Required
Not on any parts list, but you'll need them:
- A USB-A ↔ USB-B cable. The Kobuki doesn't ship with one. Item 12 on our BOM — supply your own.
- An anti-static wrist strap. The Pi 5 is unforgiving.
- M2.5 standoffs and a #1 Phillips for the Pi mounting.
- A workstation on the same WiFi with ROS_DOMAIN_ID matched. The robot is headless after first boot.
The Build at a Glance
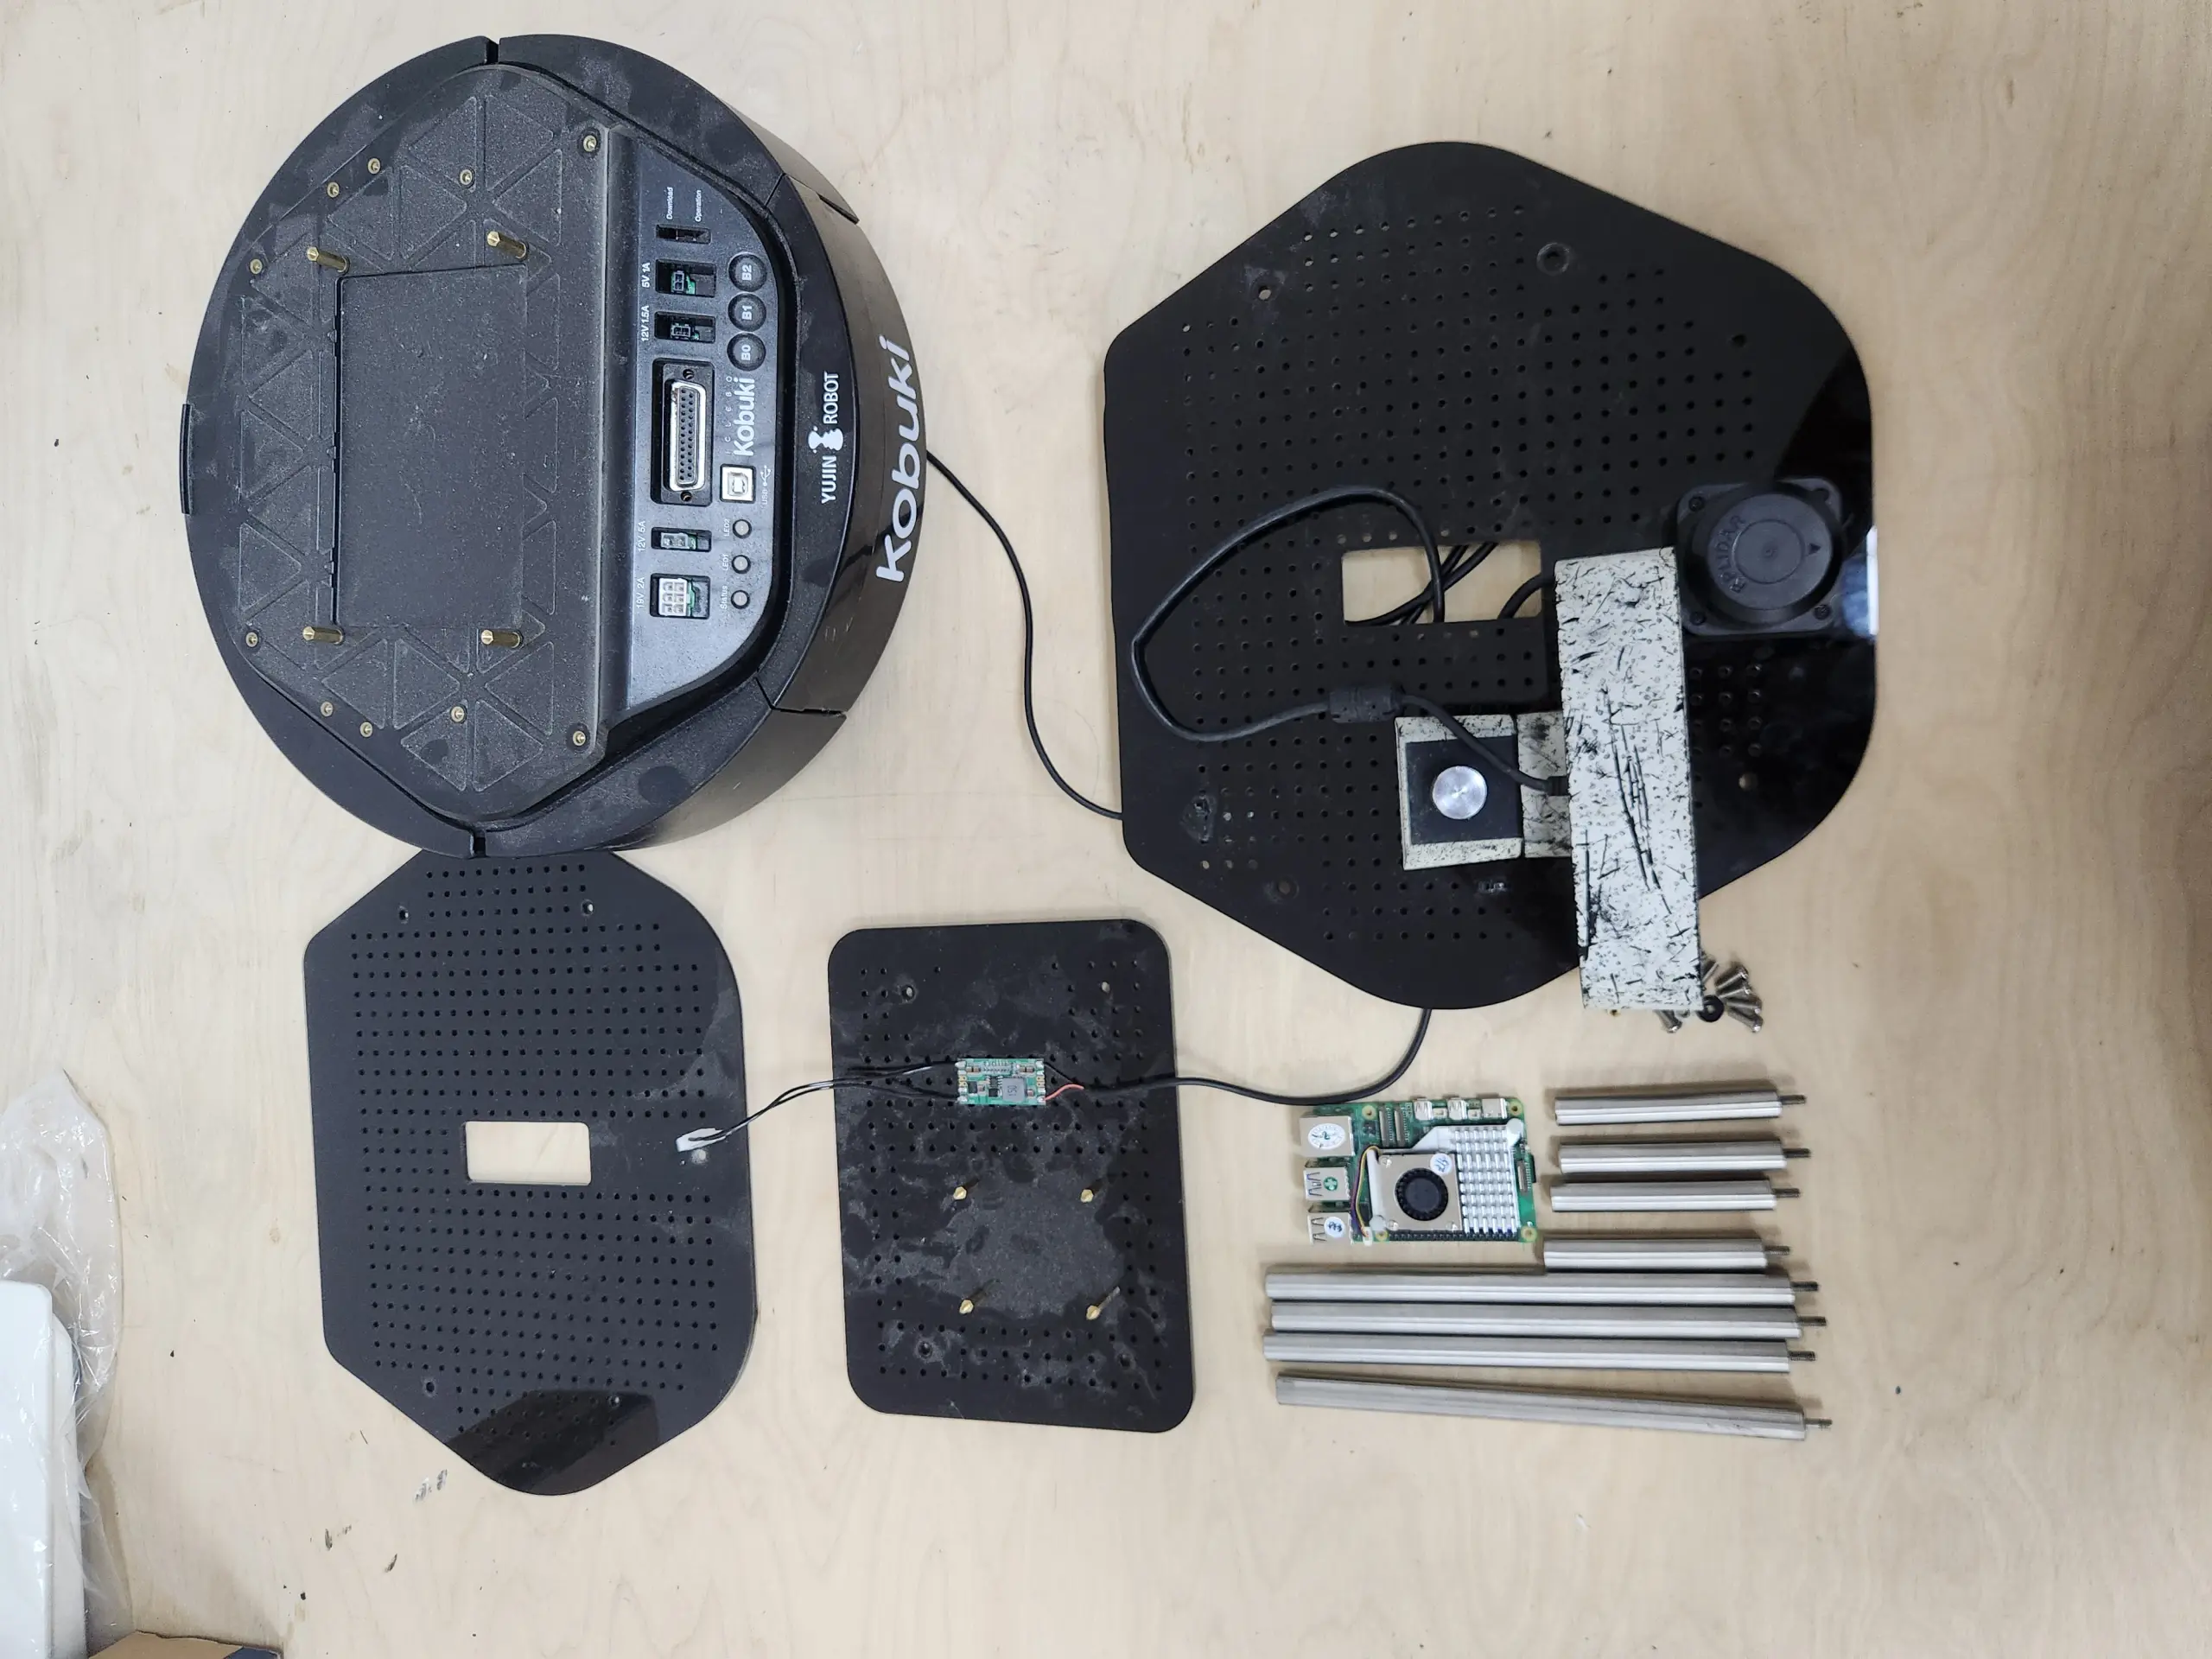
- Mobile base: Kobuki, 14h battery, 5 kg payload, 0.7 m/s top speed
- Compute: Raspberry Pi 5, 8 GB + Active Cooler
- Power: 12 V → 5 V/5 A USB-C step-down from Kobuki aux
- 2D scan: Slamtec RPLidar C1 (or A1/A2)
- 3D scan + RGB: Orbbec Astra
- Storage: 64 GB microSD class A2
- Frame: CNC plastic plate and strut set
- OS / middleware: Ubuntu 24.04 LTS + ROS 2 Jazzy
Full BOM, CAD, and udev rules in the repo.
Why The Parts Are What They Are
Pi 5 over Jetson Orin Nano. The Orin has 67 TOPS, the Pi has ~0.5. On a Turtlebot, that compute sits idle 90% of the time — Nav2, SLAM, and sensor IO are CPU-bound, not GPU-bound. Pi 5 is $80 vs $249, runs mainline Ubuntu (not JetPack), and has the largest ROS 2 community on ARM. Match the brain to the bottleneck.
Kobuki, not a custom base. Two wheels, factory-calibrated gyro, cliff sensors, IR bumpers, 14-hour battery, USB control + power passthrough. The kobuki-base org keeps the ROS 2 driver alive. Plenty of startups try to redesign this — most ship something worse for 3× the price.
RPLidar C1 + Orbbec Astra. Lidar maps geometry. The Astra reads depth and color. Different sensors, different jobs. RealSense D435 is excellent and twice the price; wrong scale for this build.
No powered USB hub on-robot. The Pi 5 has four USB ports — Kobuki, RPLidar, Astra all plug in directly. A hub adds a failure point. Keep it on the bench for debugging only.
Assembly
The frame is three perforated plates on threaded struts. Bottom to top:
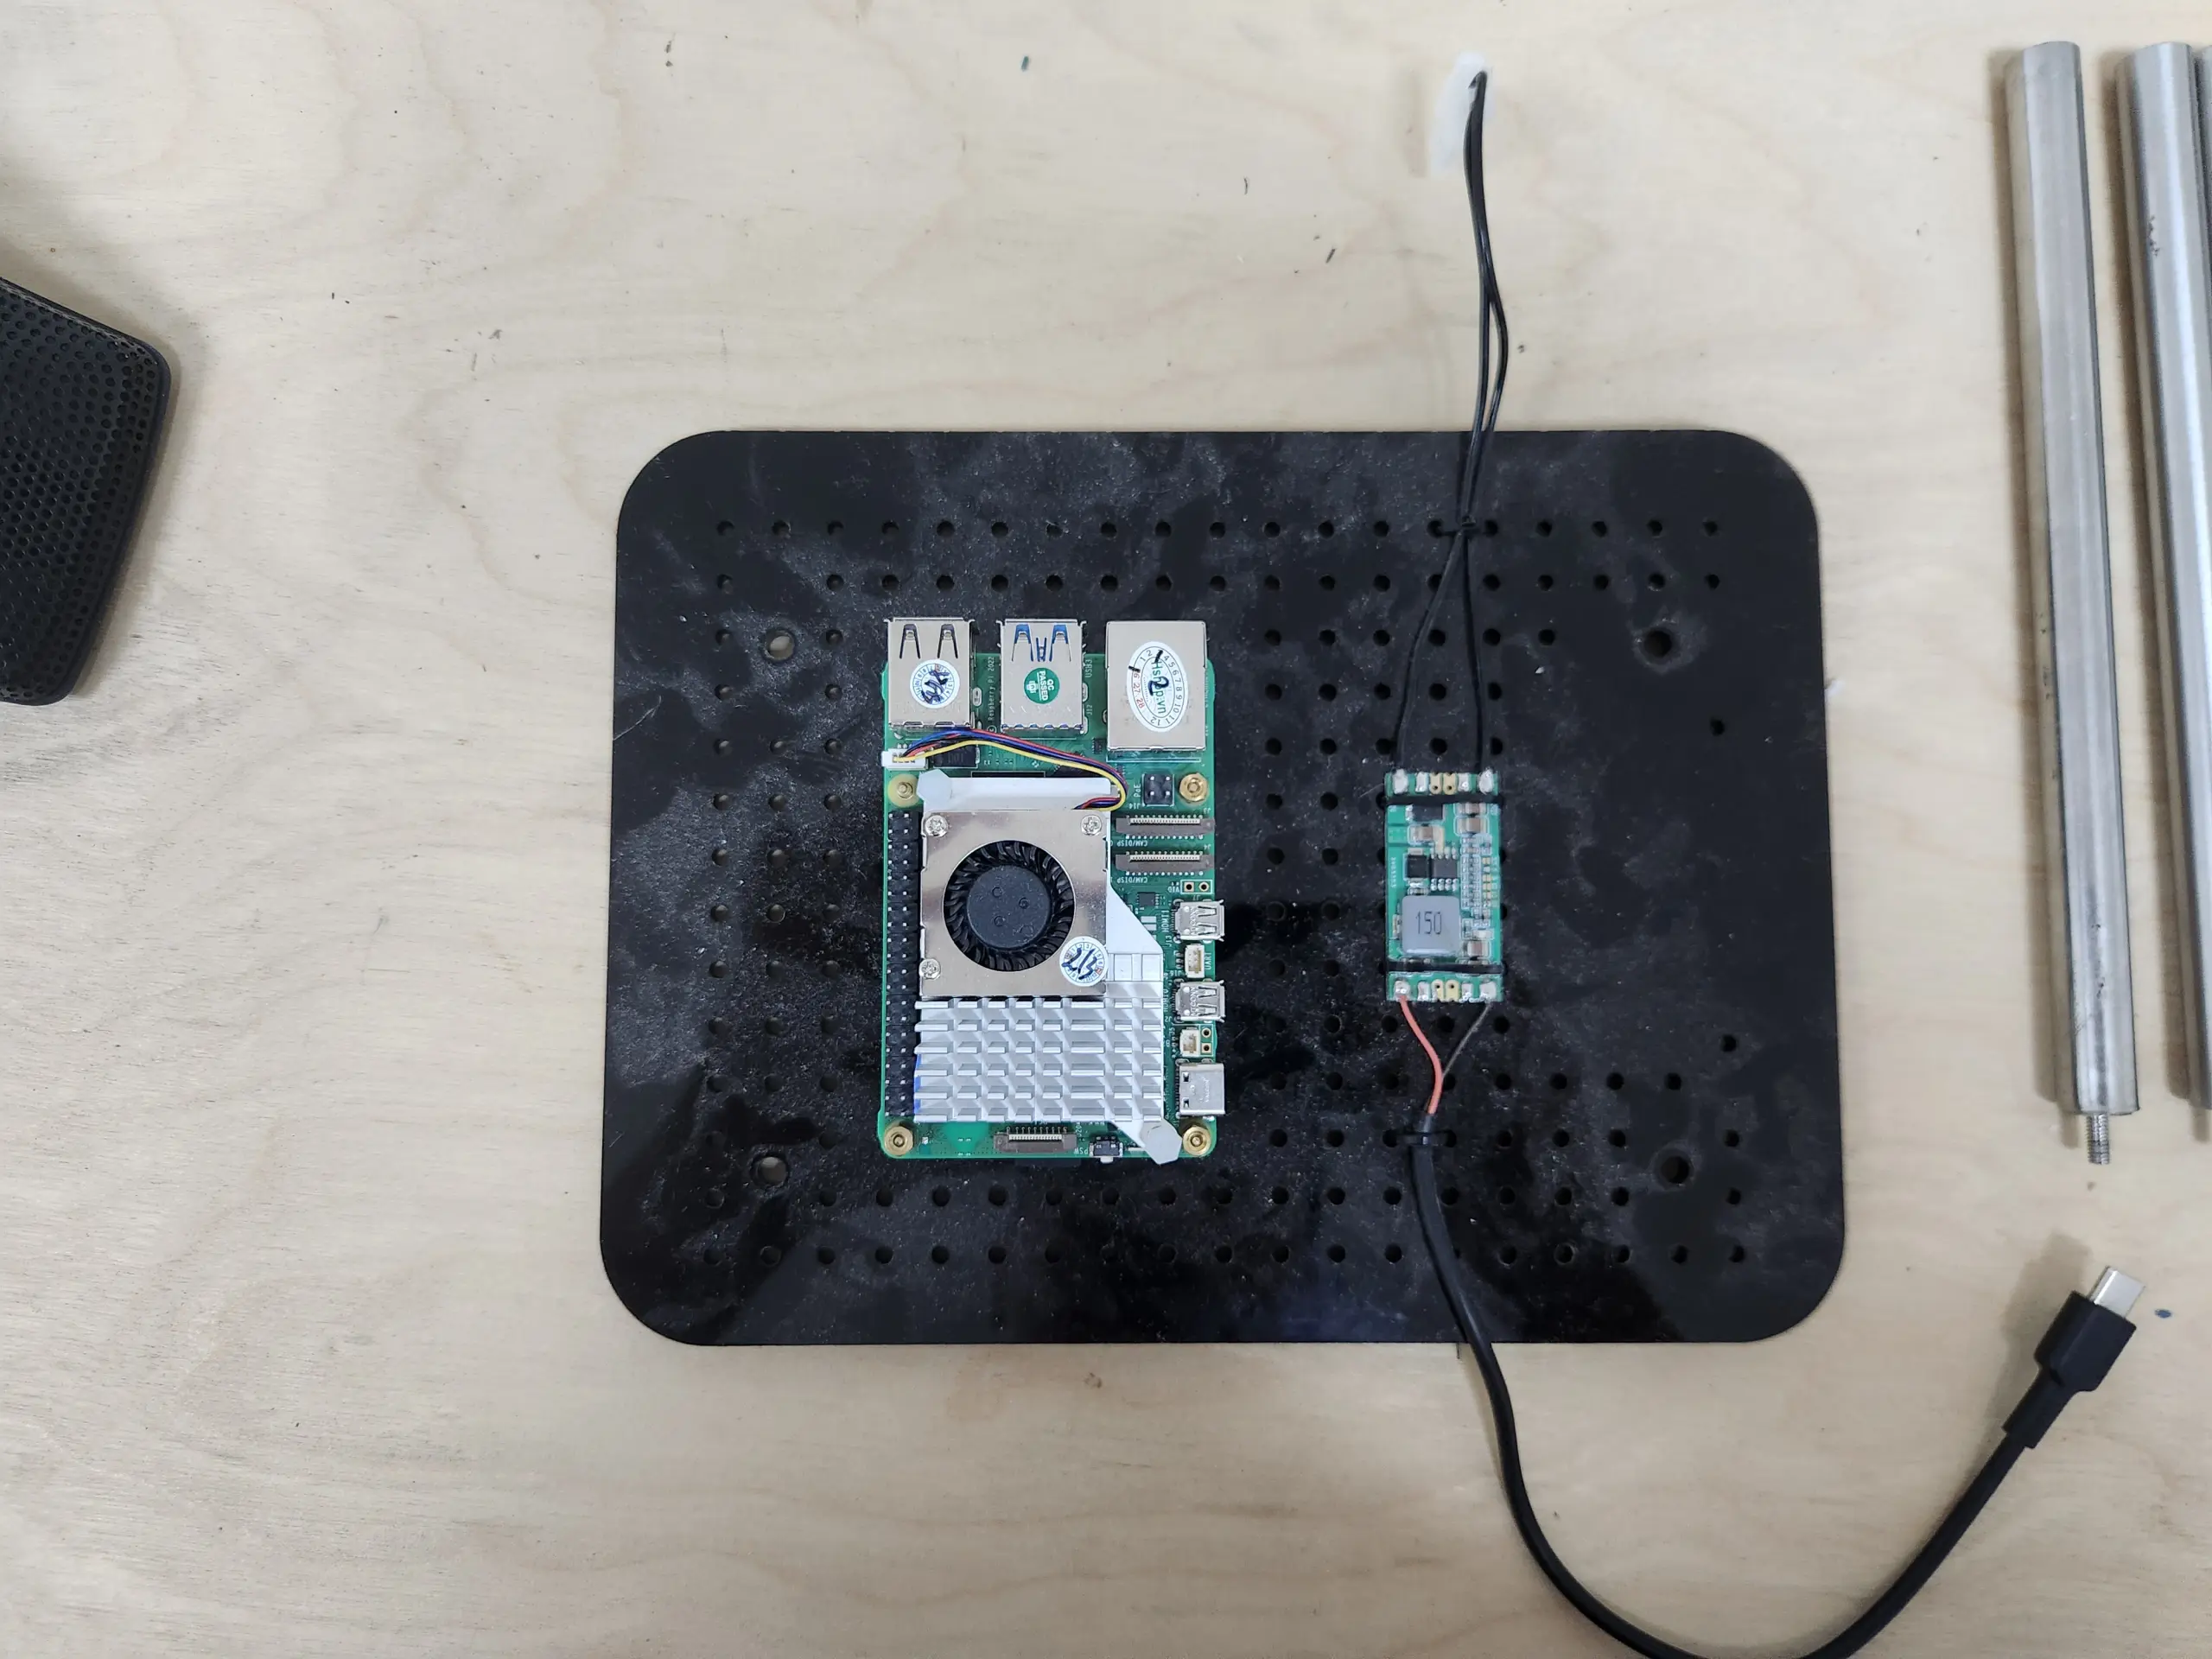
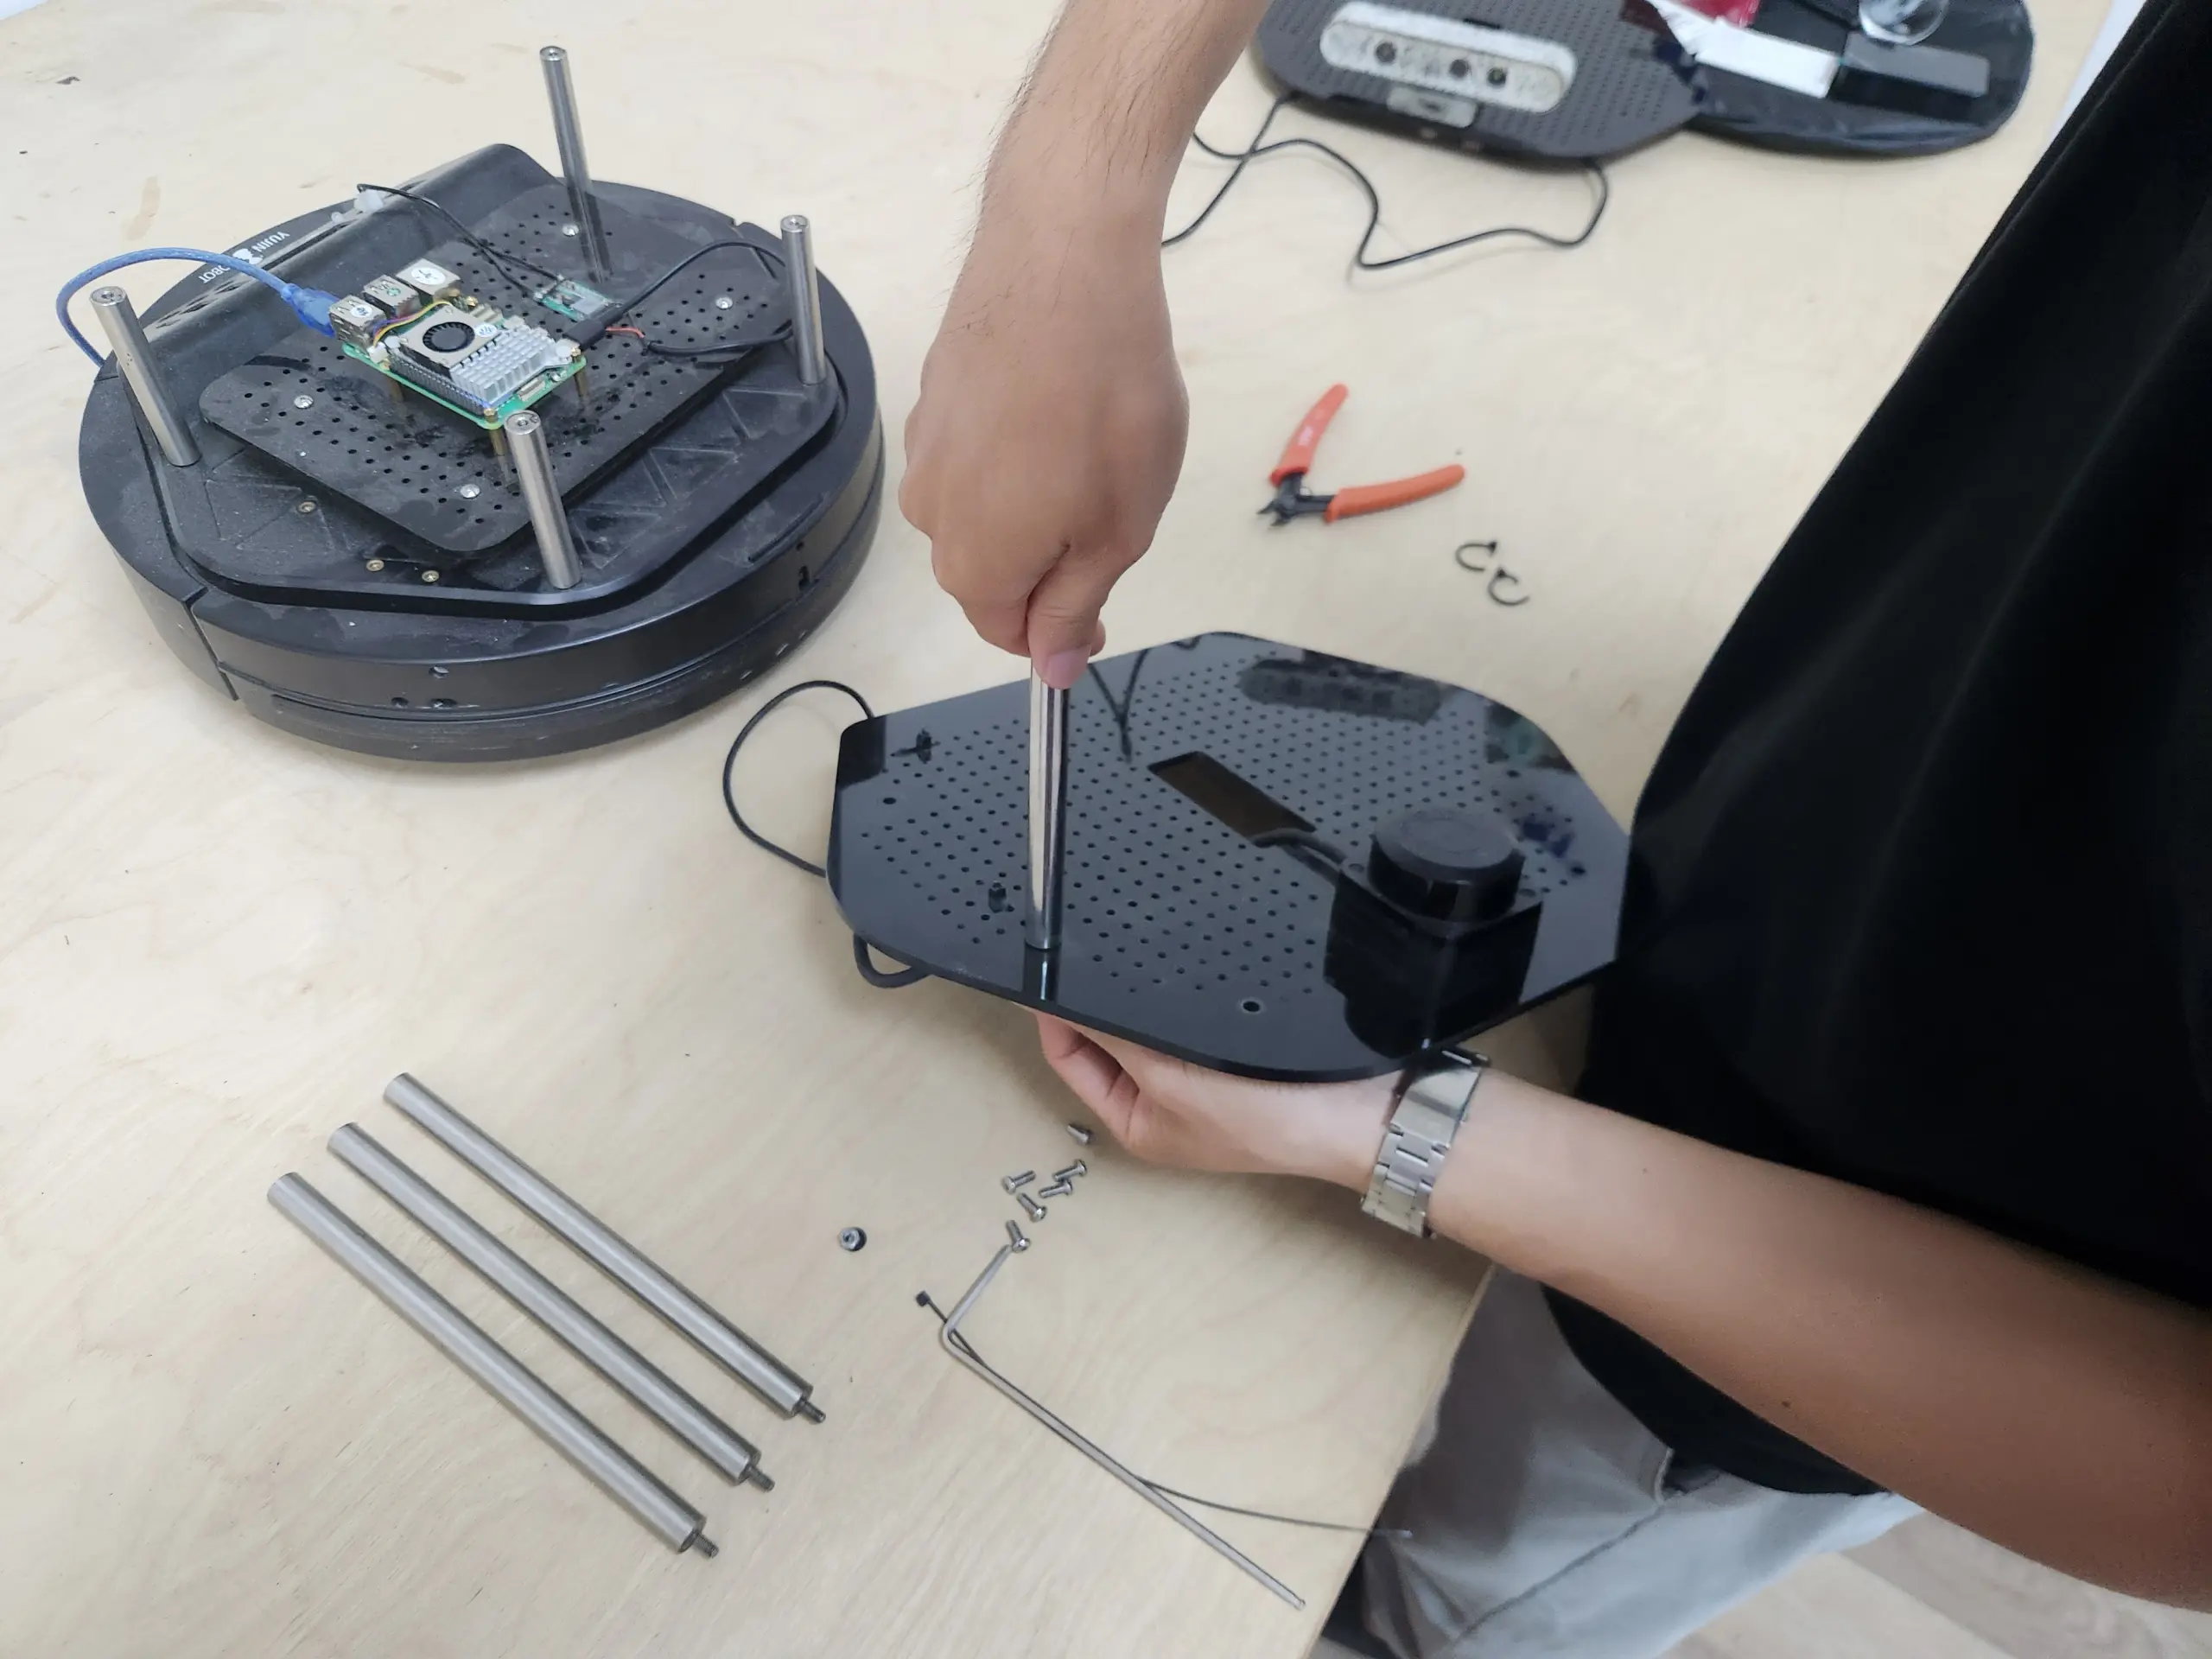
- Mount the Pi 5 on the 1st plate. Use the M2.5 standoffs to leave room between the board and the plate.
- Clip on the Active Cooler — it won't fit once Plate 2 goes above it.
- Mount Plate 1 on the Kobuki base and connect the board to the base with the USB-A ↔ USB-B cable.
- Connect the step-down PD power supply between the Kobuki's 12 V aux out and the Pi 5's USB-C power port so the base can power the board.
- Mount the struts on the base.
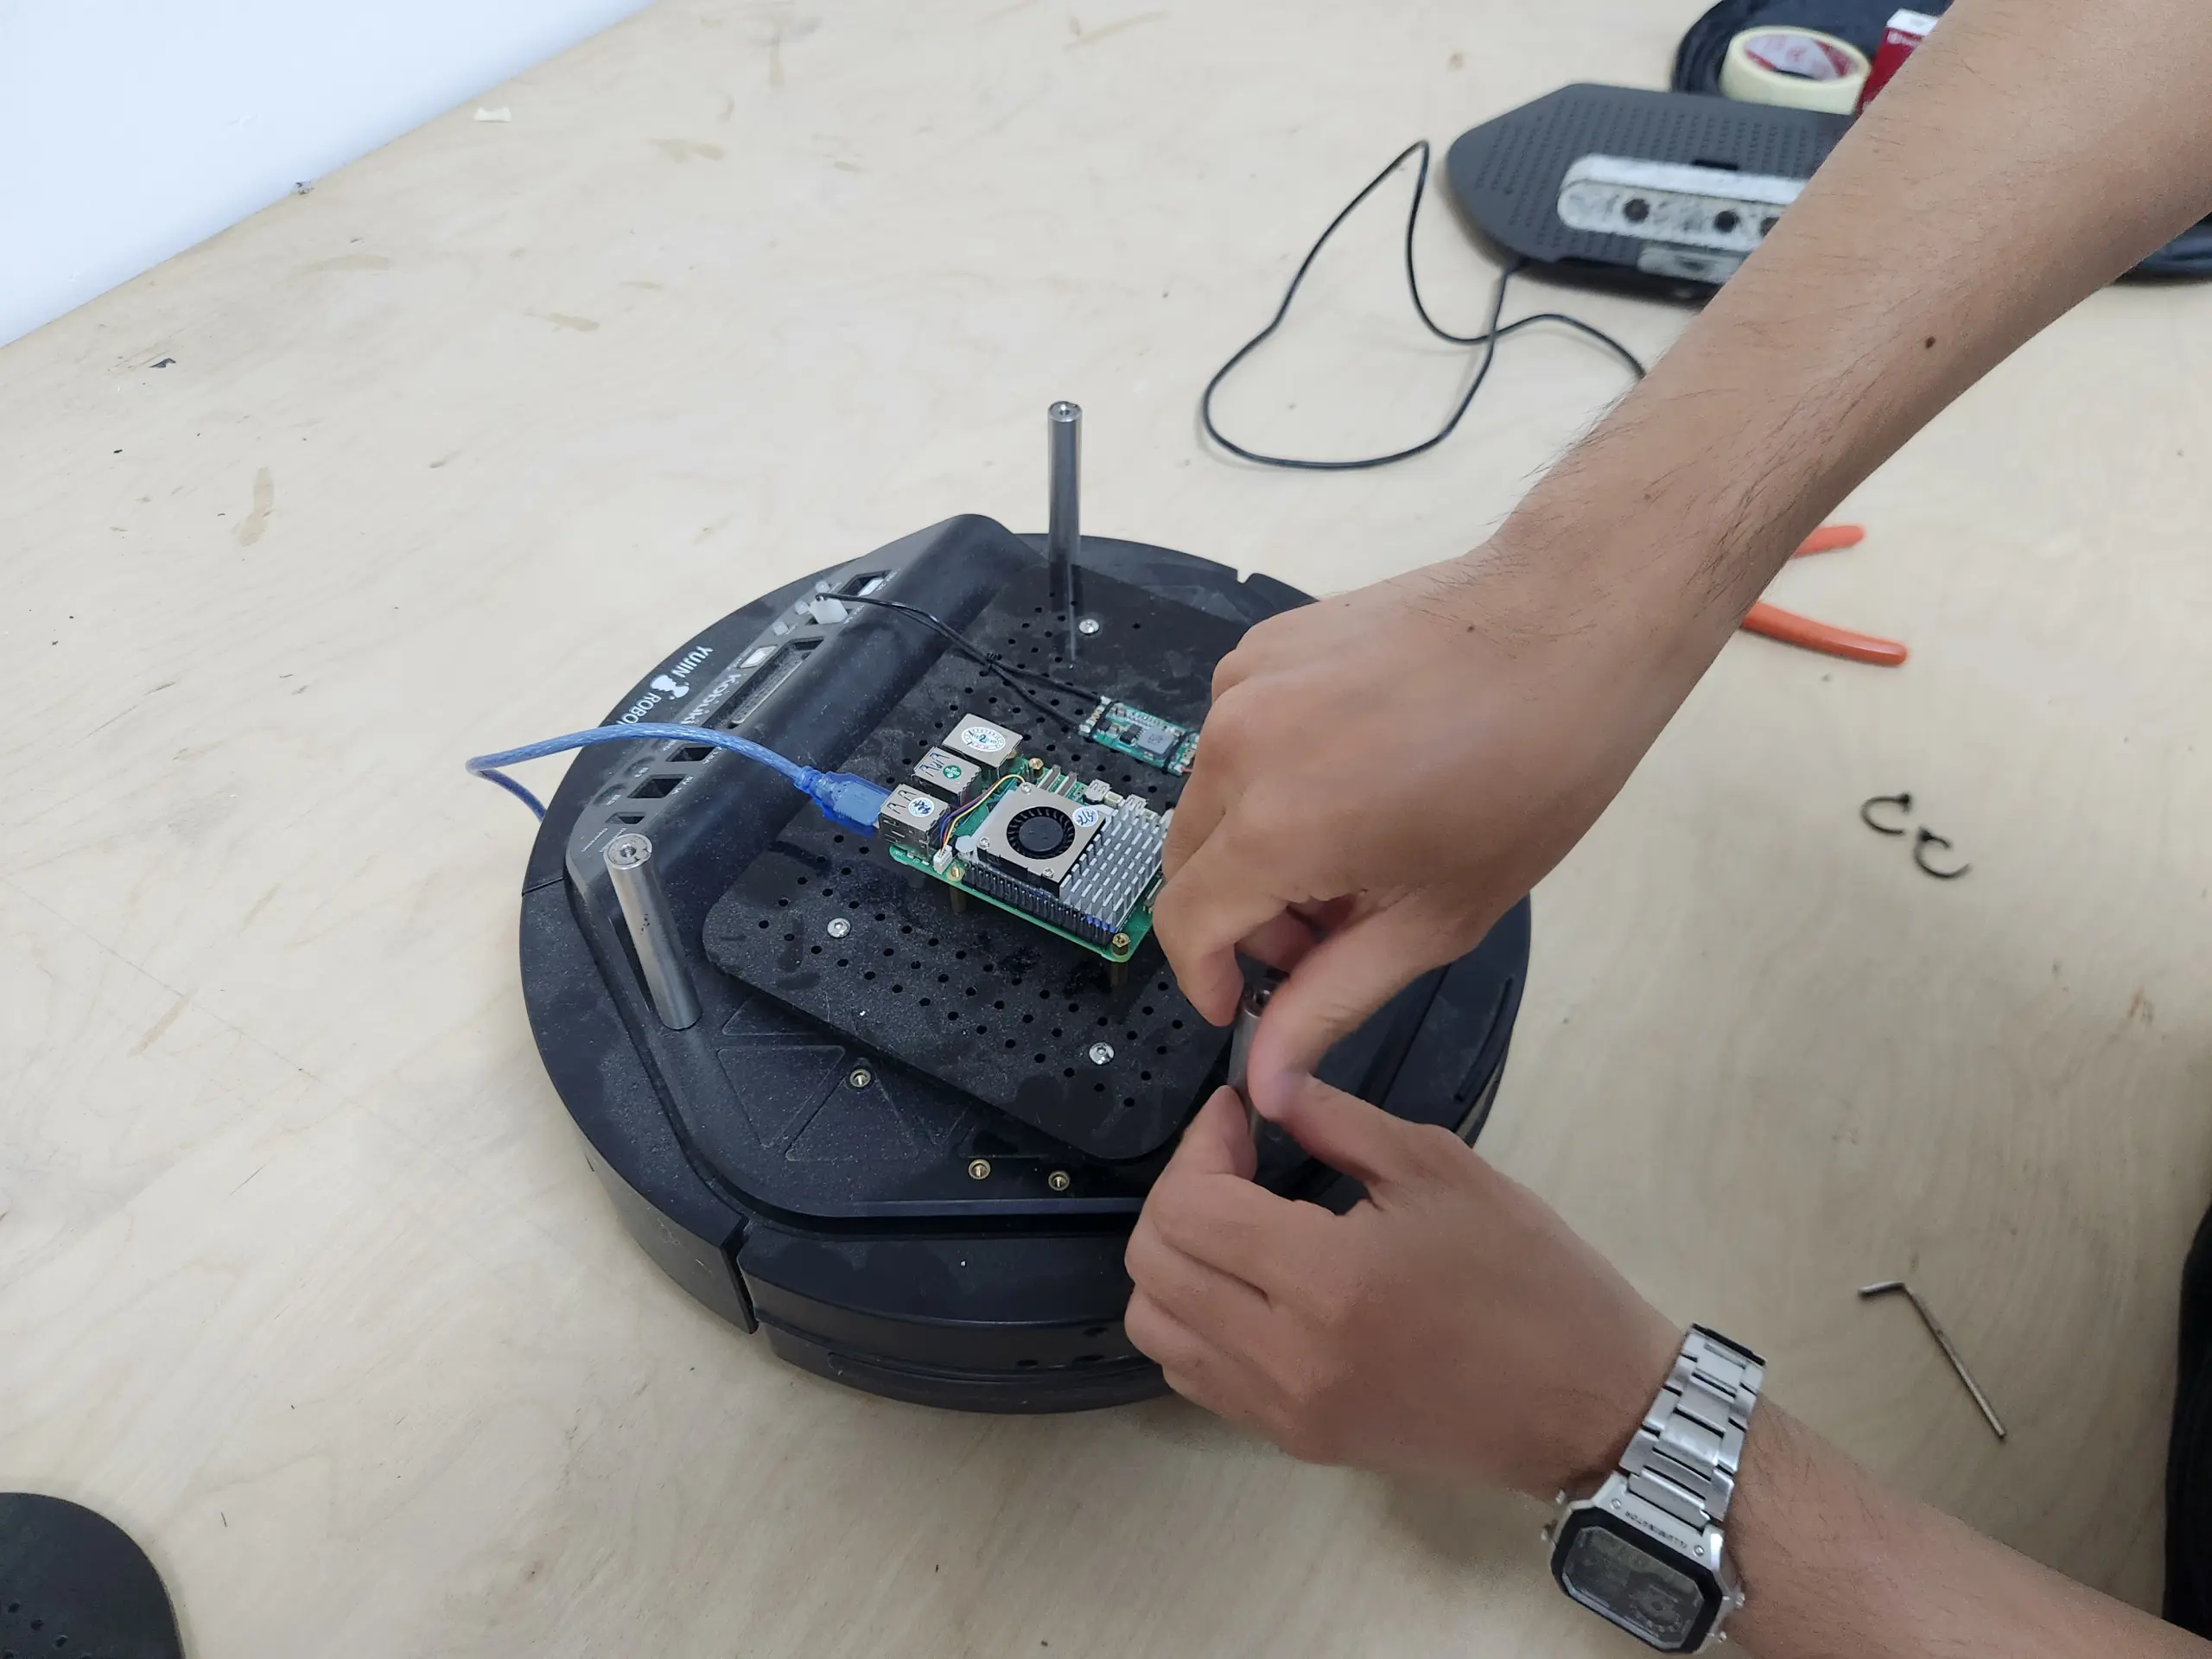
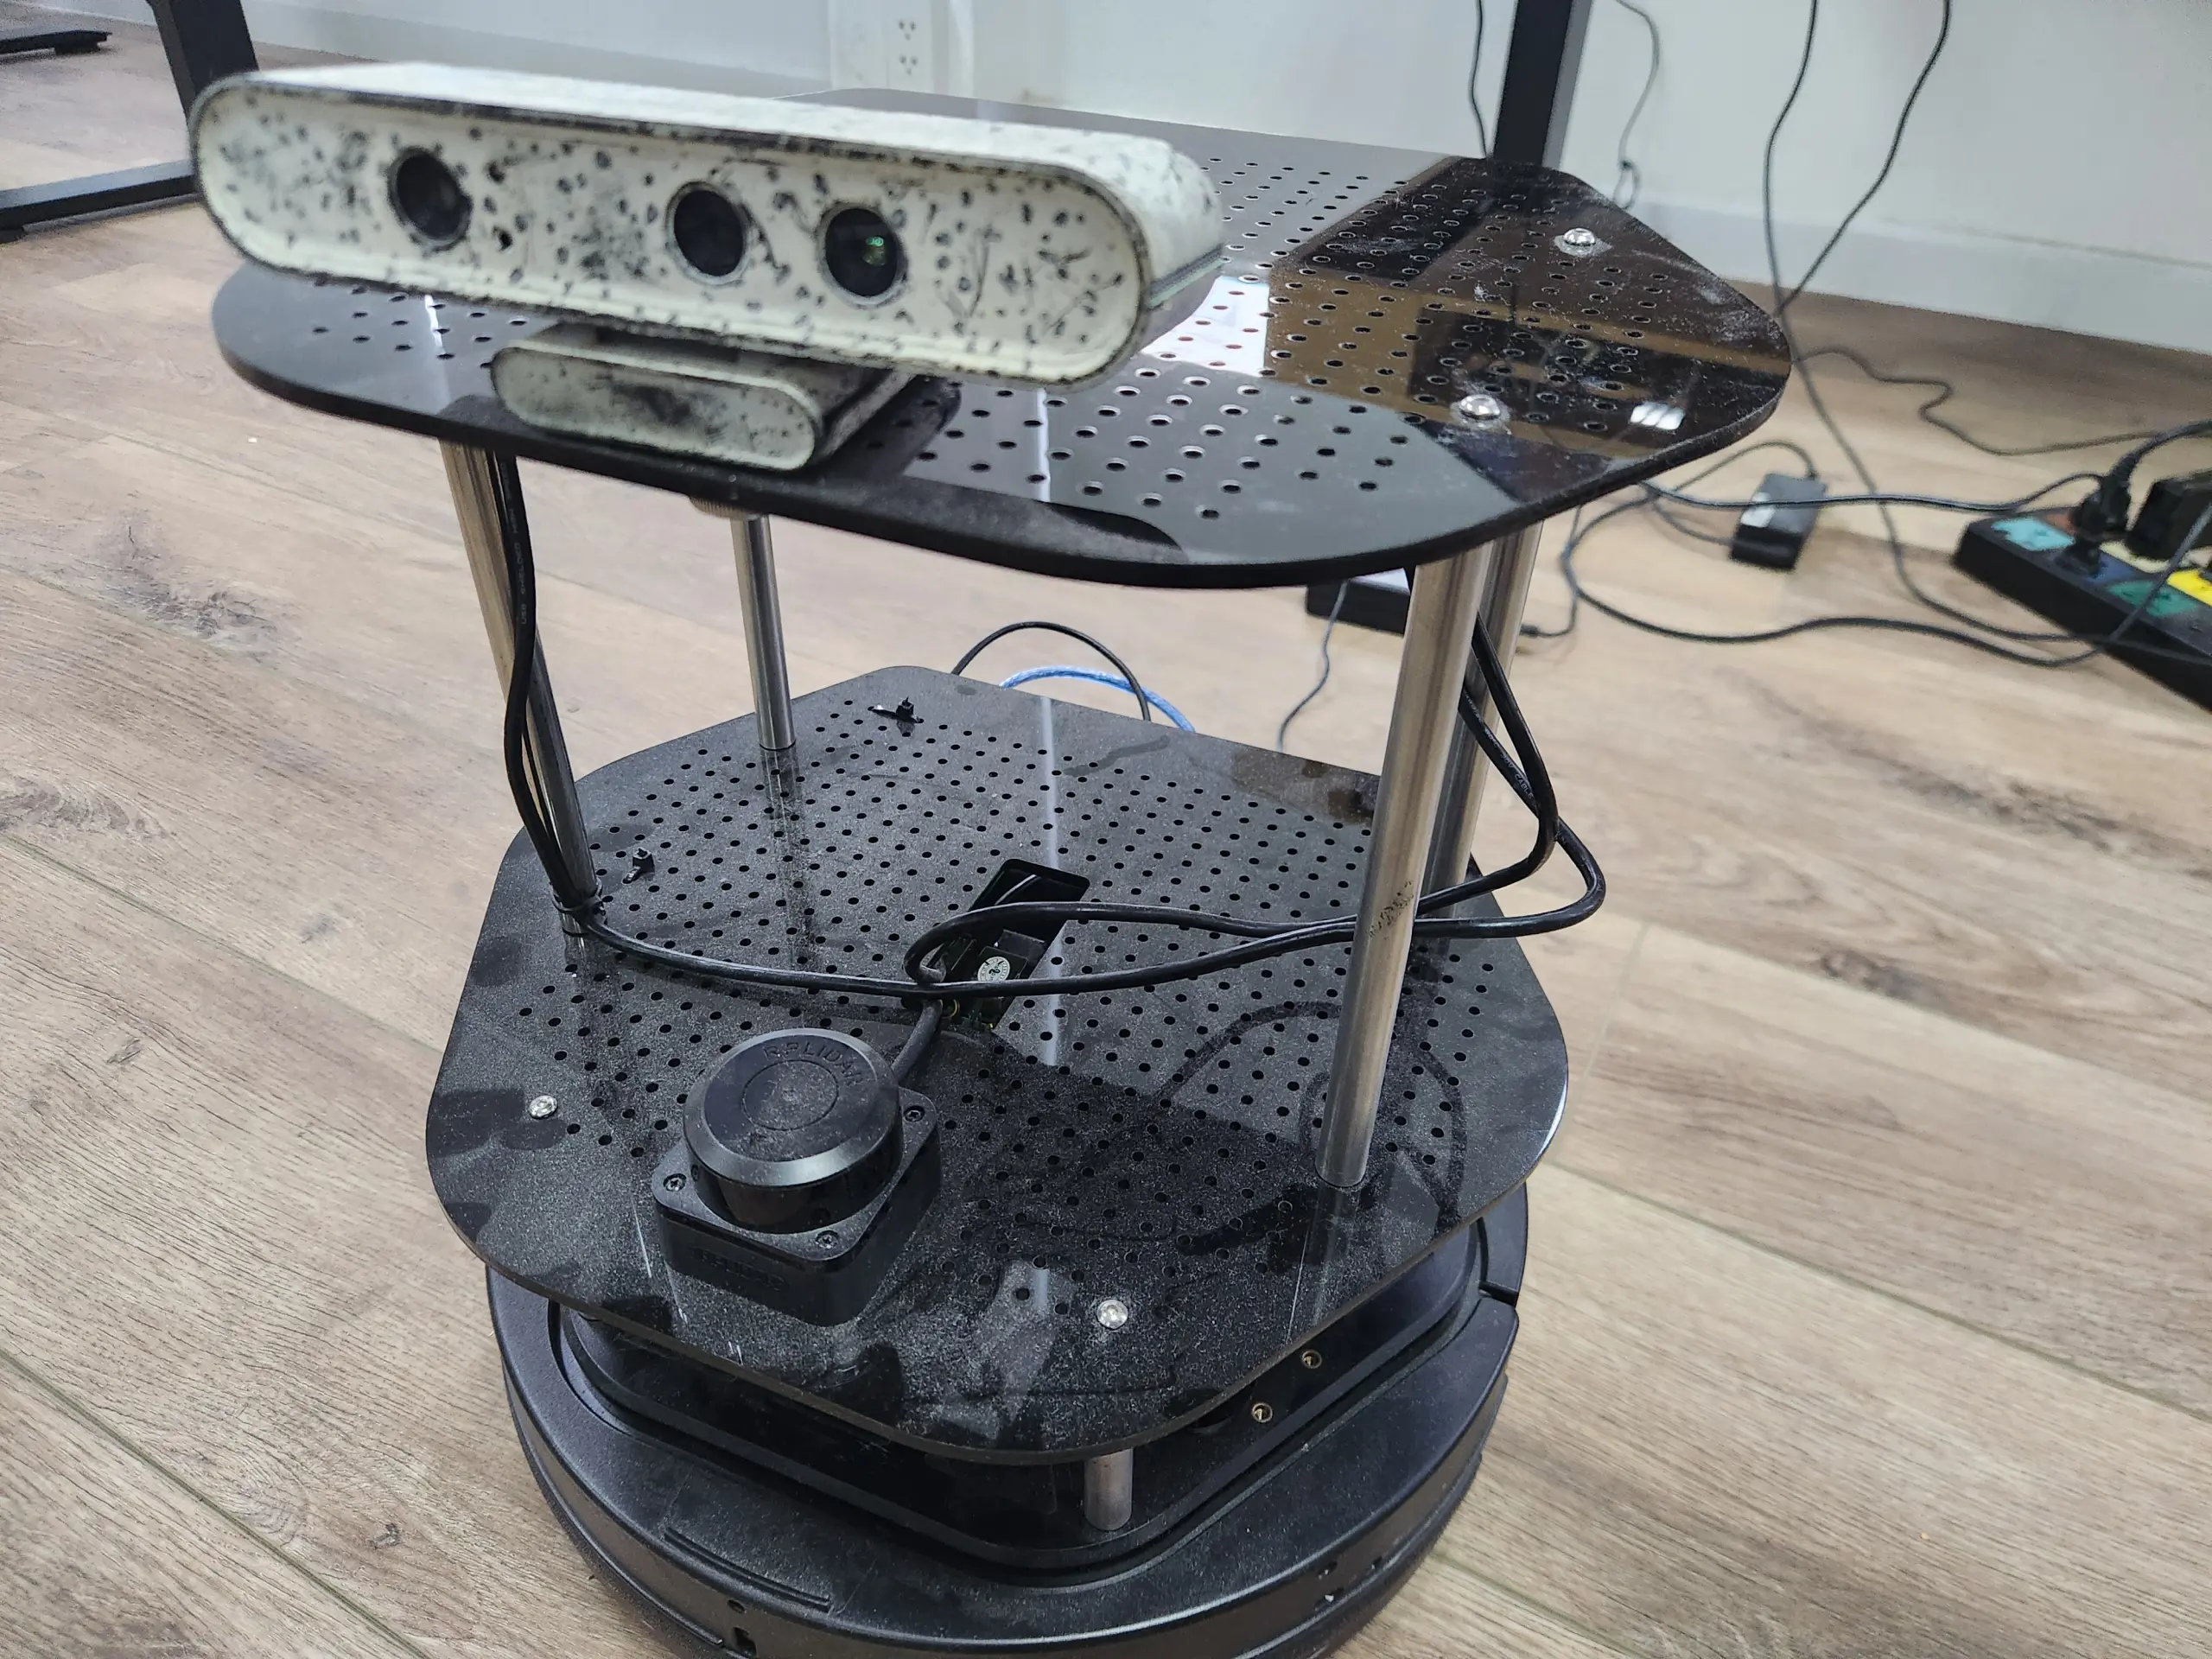
- Plate 2 carries the RPLidar. The lidar's mounting screws use the perforated grid on the plate — center it on the robot's forward axis so laser_link and base_link don't need a yaw offset.
- Mount the struts on Plate 2 before attaching it to the Kobuki. Easier with more space and room to work the screws.
- The Orbbec Astra goes on the top plate, angled slightly forward.
- Assemble all of the plates onto the base. Each plate has a cut-out hole in the center for wiring. Secure the wires to the plates and struts with zip ties to tidy things up.
- Connect the RPLidar and the Orbbec Astra to the Pi 5's USB-A ports. The robot is ready for its first boot.
Three things the original Yujin diagrams skip:
- The USB-A ↔ USB-B cable isn't in the kit. You supply it.
- The Kobuki has a power switch on the rim of the base. Easy to miss. The robot is fully dark until you flip it.
- The dock has no internal cable. Open the rear cover, route the dock PSU through the side hole, plug into the socket on the roof.
Power: Never Feed the Pi Through Kobuki USB-B
The Kobuki USB-B is a data port. It cannot supply enough current to power a Pi 5 under load. Always power the Pi from the 12 V aux output via the step-down regulator, or — for bench work — the official 27 W USB-C PSU.
Symptoms of an inadequate PSU: kernel under-voltage detected messages, USB devices disconnecting mid-session, ROS nodes dying with no obvious cause. Diagnose with vcgencmd get_throttled. Anything non-zero means the supply is sagging. Fix the power chain before blaming software.
Quick Test Before Software
Borrowed from the Kobuki manual, still works in 2026:
- Charge the battery to ≥ 50%.
- Flip the power switch on the rim.
- Hold the B0 button for ~2 seconds.
The base enters the random walker demo — drives in arbitrary directions, reverses off bumper contacts, respects cliff sensors. Loud, that's normal. If it scuttles, the hardware is alive. Power off with B0 again or the rim switch.
First Log On
Flash Ubuntu 24.04 LTS (server is fine, desktop has rviz2) to the microSD via Raspberry Pi Imager. Bake in SSH key, WiFi credentials, and hostname before writing — no headless config dance after boot.
SSH in, then update and install ROS 2 Jazzy:
sudo apt update && sudo apt full-upgrade -ysudo apt install -y ros-jazzy-desktop ros-dev-toolsAdd to ~/.bashrc:
Reuse the same ROS_DOMAIN_ID on the workstation. Verify with ros2 doctor and a talker/listener pair.
source /opt/ros/jazzy/setup.bashexport ROS_DOMAIN_ID=42Reuse the same ROS_DOMAIN_ID on the workstation. Verify with ros2 doctor and a talker/listener pair.
Build the Kobuki Stack from Source
kobuki_ros isn't published as a Jazzy binary. The kobuki-base org targets Foxy, but the devel branches build cleanly on Jazzy. Clone the submodules, symlink ~/ws/src to external/, and build:
cd ~/wsrosdep install --from-paths src --ignore-src -r -ycolcon build --symlink-install~10–20 min on a Pi 5 with active cooling. If you hit OOM, bump swap to 4 GB. Drop in the udev rule from kobuki_core/60-kobuki.rules so the Kobuki always shows up at /dev/kobuki, not a random /dev/ttyUSBn.
Stable Device Paths Matter
Both the Kobuki (FTDI) and RPLidar (Silicon Labs CP210x) enumerate as USB-serial. Without udev rules, they swap /dev/ttyUSB0 and /dev/ttyUSB1 on every reboot. Install the rules from each driver — Kobuki becomes /dev/kobuki, lidar becomes /dev/rplidar. Reference these in launch files. Never reference /dev/ttyUSB0 directly.
The Celebration Moment
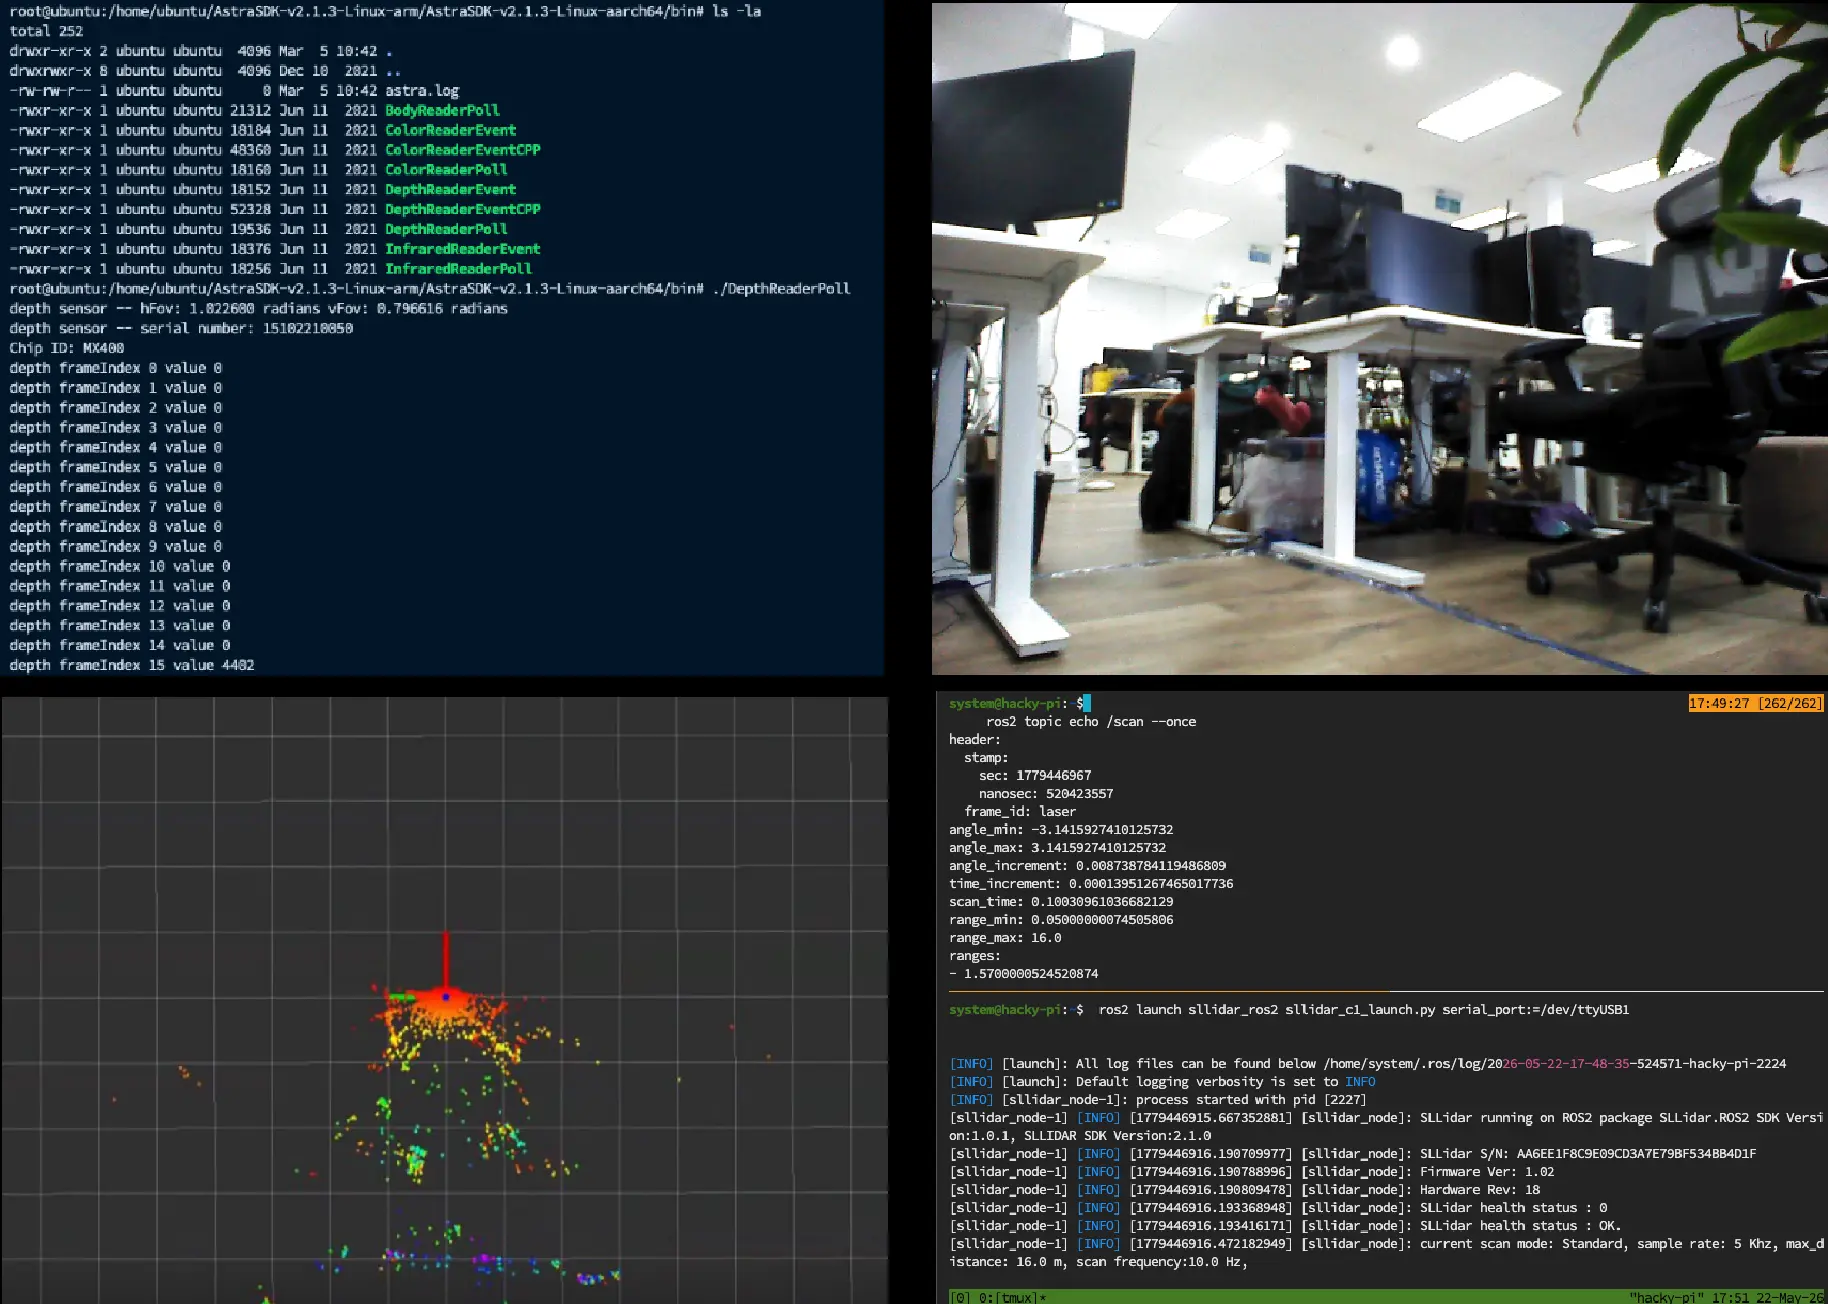
You can celebrate when this launches the base:
ros2 launch kobuki_node kobuki_node-launch.pyIn a second session, confirm the base is alive:
Battery around 16.7 V on a full charge. Then drive it:
ros2 topic echo /battery_state --onceBattery around 16.7 V on a full charge. Then drive it:
ros2 run kobuki_keyop kobuki_keyop_node --ros-args -r /cmd_vel:=/commands/velocityArrow keys drive. No soft-start — 0 to commanded velocity in one tick. Put it on blocks or in an open space first.
Preliminary Conclusions
For those looking to enter physical AI without a six-figure budget, a couple hundred dollars in parts is the right end of the mobile-robot spectrum. A pre-built Turtlebot 4 would cost a little extra if you'd rather skip the assembly.
I've spent a lot of time on workshop floors building robots and chasing USB enumeration bugs to get things that sort of work. This one works and lets you go straight to the hard problems — SLAM, Nav2, sim-to-real, agent control over ROS 2. If that sounds like your idea of fun, build it.
We're not selling this build. There's no part of it that's proprietary except a couple of CAD files for sensor mounts, and those are open-source in the repo.
Open Source
Full BOM, CAD, udev rules, ROS 2 launch files, and every gotcha that didn't fit this post:
→ github.com/autonomous-ai/Personal-AI-Robot
→ github.com/autonomous-ai/Personal-AI-Robot
If you build one, the door is open for help: @dee_hw.