Building your own Personal AI Server
The On-Premise Business AI Center is the third inference box we've built at the Autonomous workshop. This post will give you the build with fill parts walkthrough, ROI math and the chassis design by the Autonomous team.
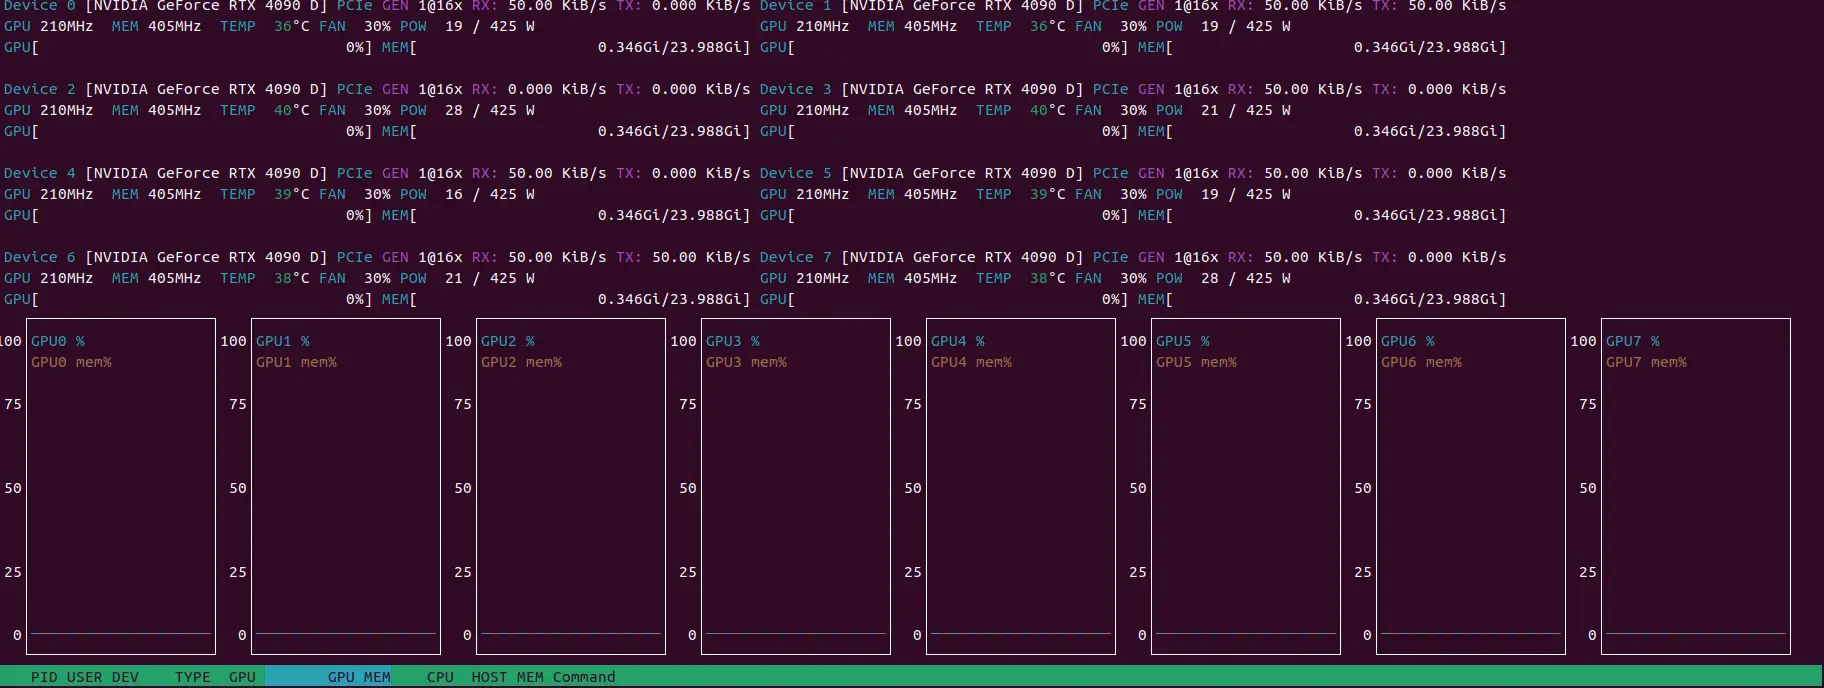
Eight is where one box replaces an entire team's API bill. Four cards tensor-parallel will host any 70B open model. Eight gets you DeepSeek-V3, MiniMax M2, larger Qwen variants, and Kimi K2 once you've expanded storage, serving production while a second model serves staging while a third is in fine-tuning.
Additional Components Required
Not on any parts list, but you'll need them:
- A 30A 240V circuit, dedicated. A standard 15A 120V outlet gives 1,800W. This box draws ~4,600W under load.
- C19 power cables, four of them. PSUs ship with C13 cables that don't fit a rack PDU.
- A torque screwdriver, 0.4–0.6 Nm range. MCIO connector retention has an actual torque spec buried in the motherboard manual.
- A second person. The rig weighs ~77lbs.
The Build at a Glance
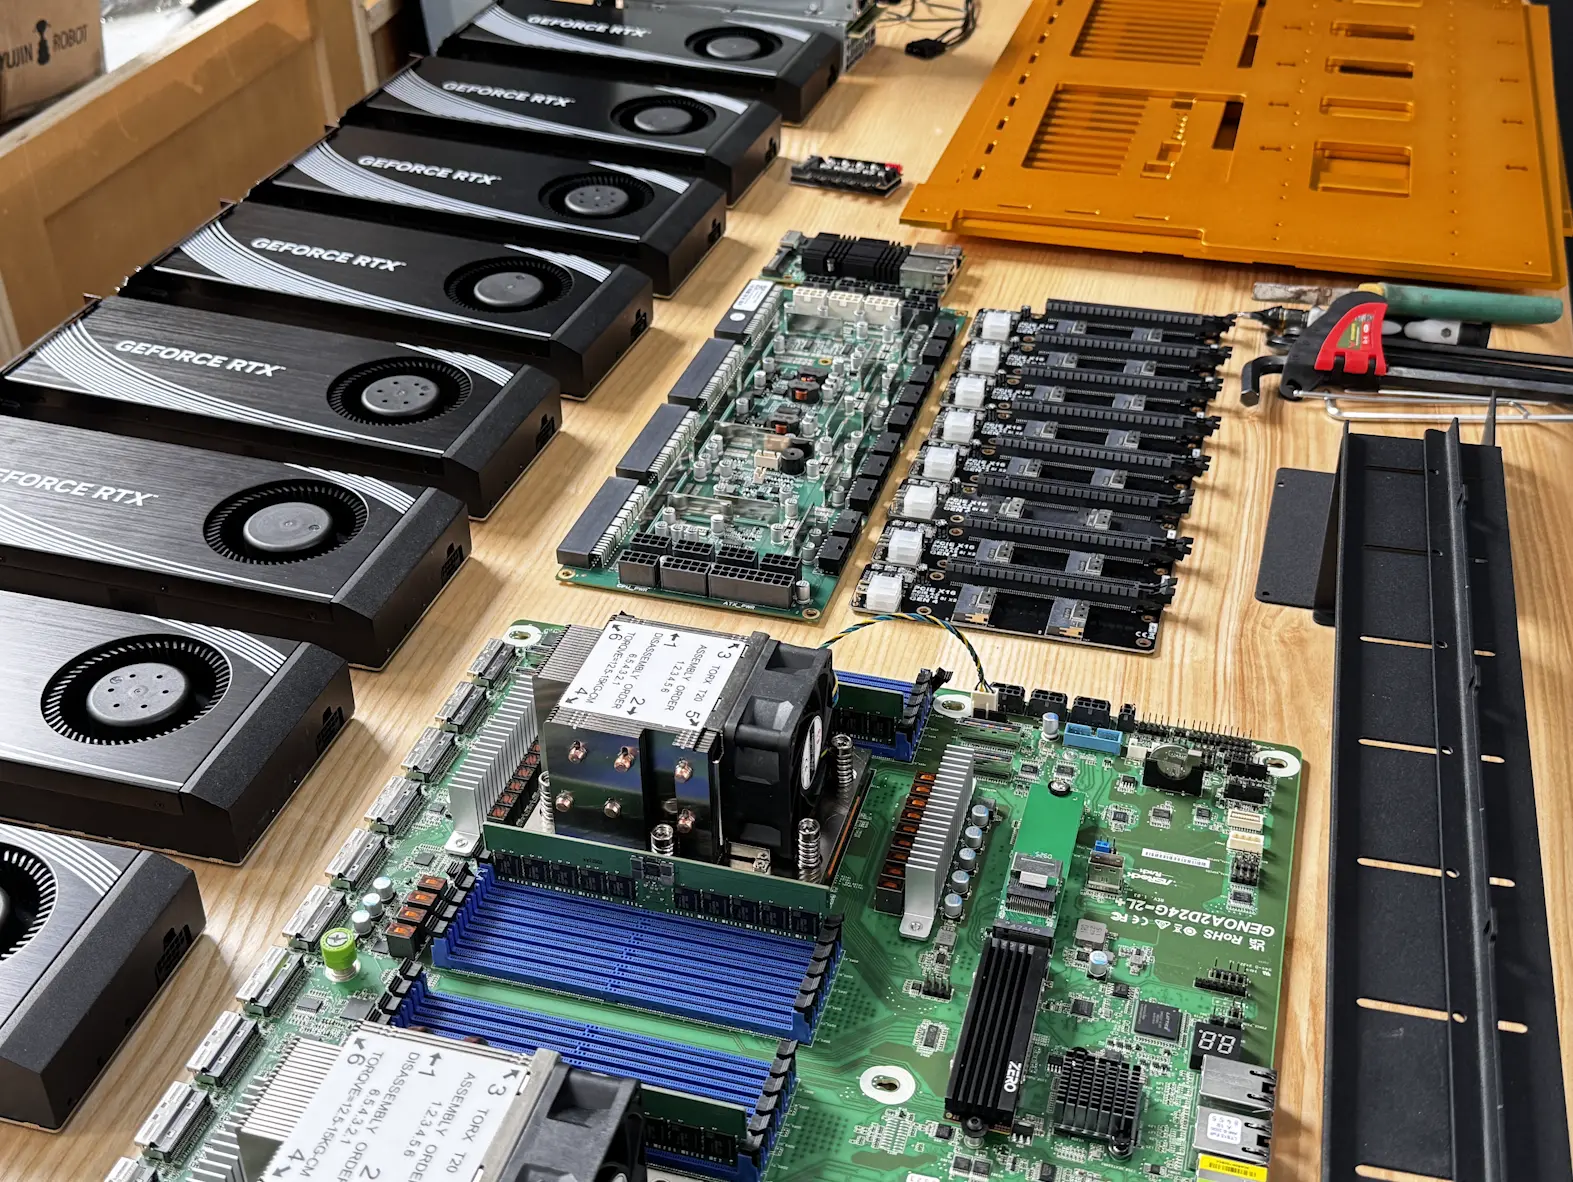
- GPUs: 8× RTX 4090D, 425W TDP, 24GB VRAM each, 192GB total
- GPU power cables: 8× 600W (one per card)
- CPUs: 2× AMD EPYC 9004 (Genoa, SP5 socket)
- CPU cooling: 2× air heatsinks
- Board: ASRock Rack GENOA2D24G-2L+, dual SP5, 24 DIMM, 16 MCIO
- RAM: 4× DDR5 ECC RDIMM (board supports up to 24 sticks; scale per workload)
- Storage: 4× DDR5 ECC RDIMM (board supports up to 24 sticks; scale per workload)
- MCIO: 16 cables + 8 MCIO-to-PCIe Gen5 x16 adapters
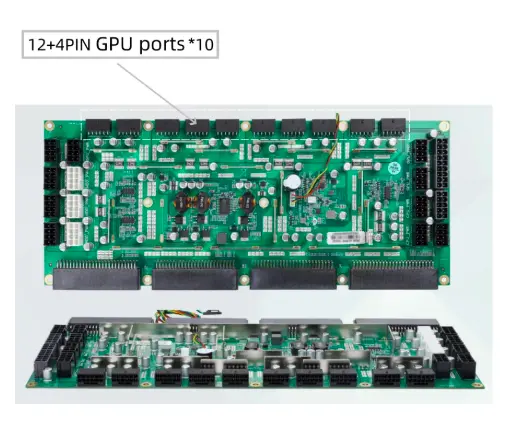
- PSU: 4× units, 8 kW total, on a dedicated PSU board
- Case cooling: 12× 120mm fans + fan hub
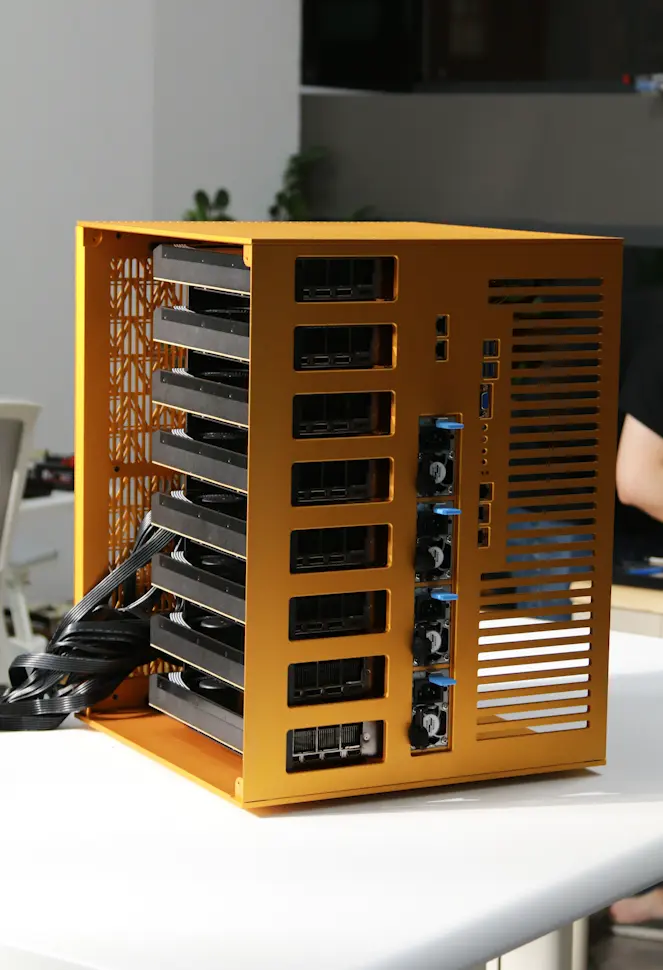
- Chassis: Custom, CNC'd in the workshop (CAD in repo)
Why The Parts Are What They Are
Dual-socket isn't optional. A single Genoa chip gives 128 PCIe Gen5 lanes. Eight GPUs at x16 each eats all 128. The second socket carries everything else: NVMe array, NIC, future expansion. Total: 256 lanes. Buy the chip for the lanes, not the cores. Inference doesn't starve on 32 EPYC cores; we never see CPU utilization above 40% under sustained multi-model serving.
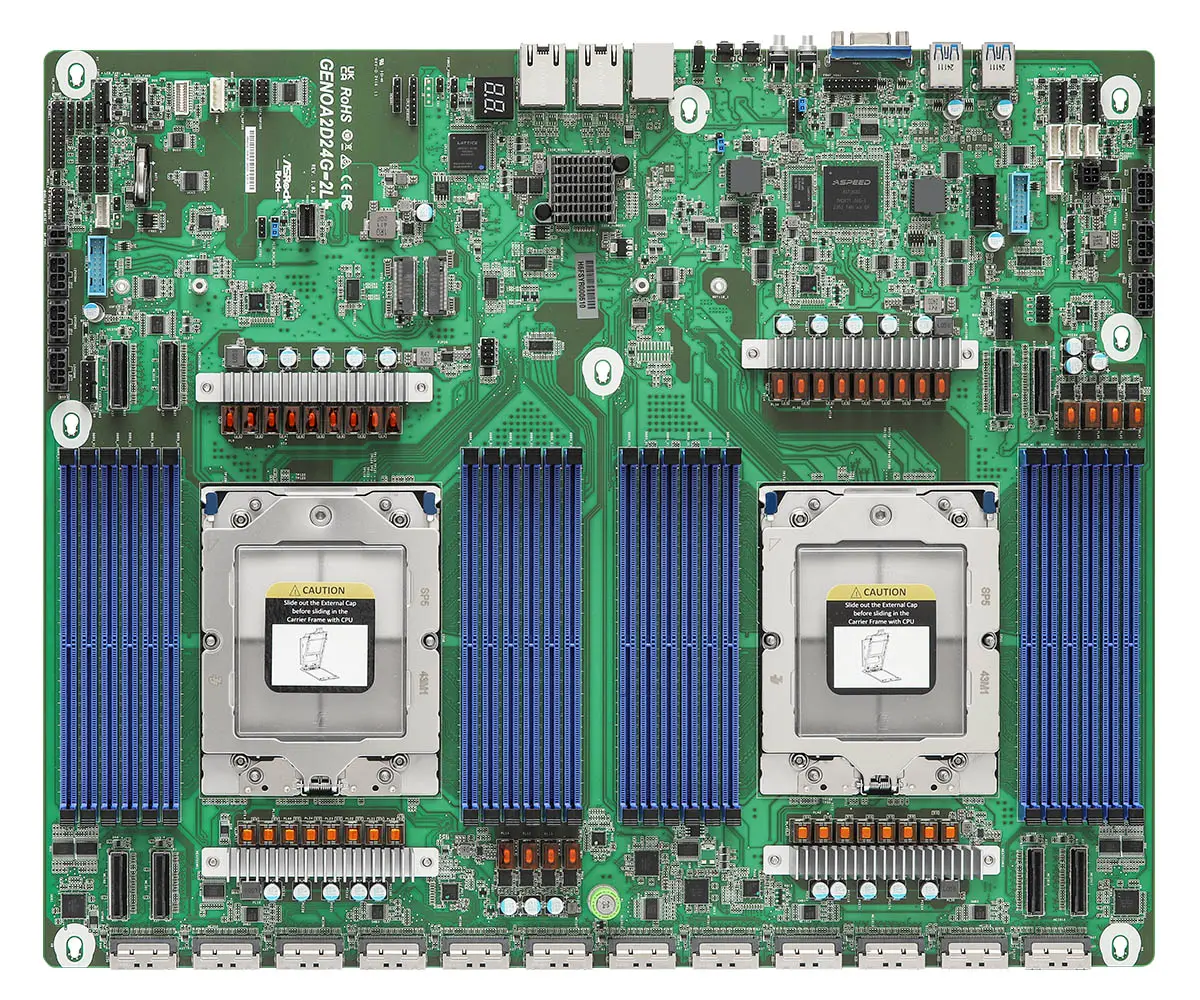
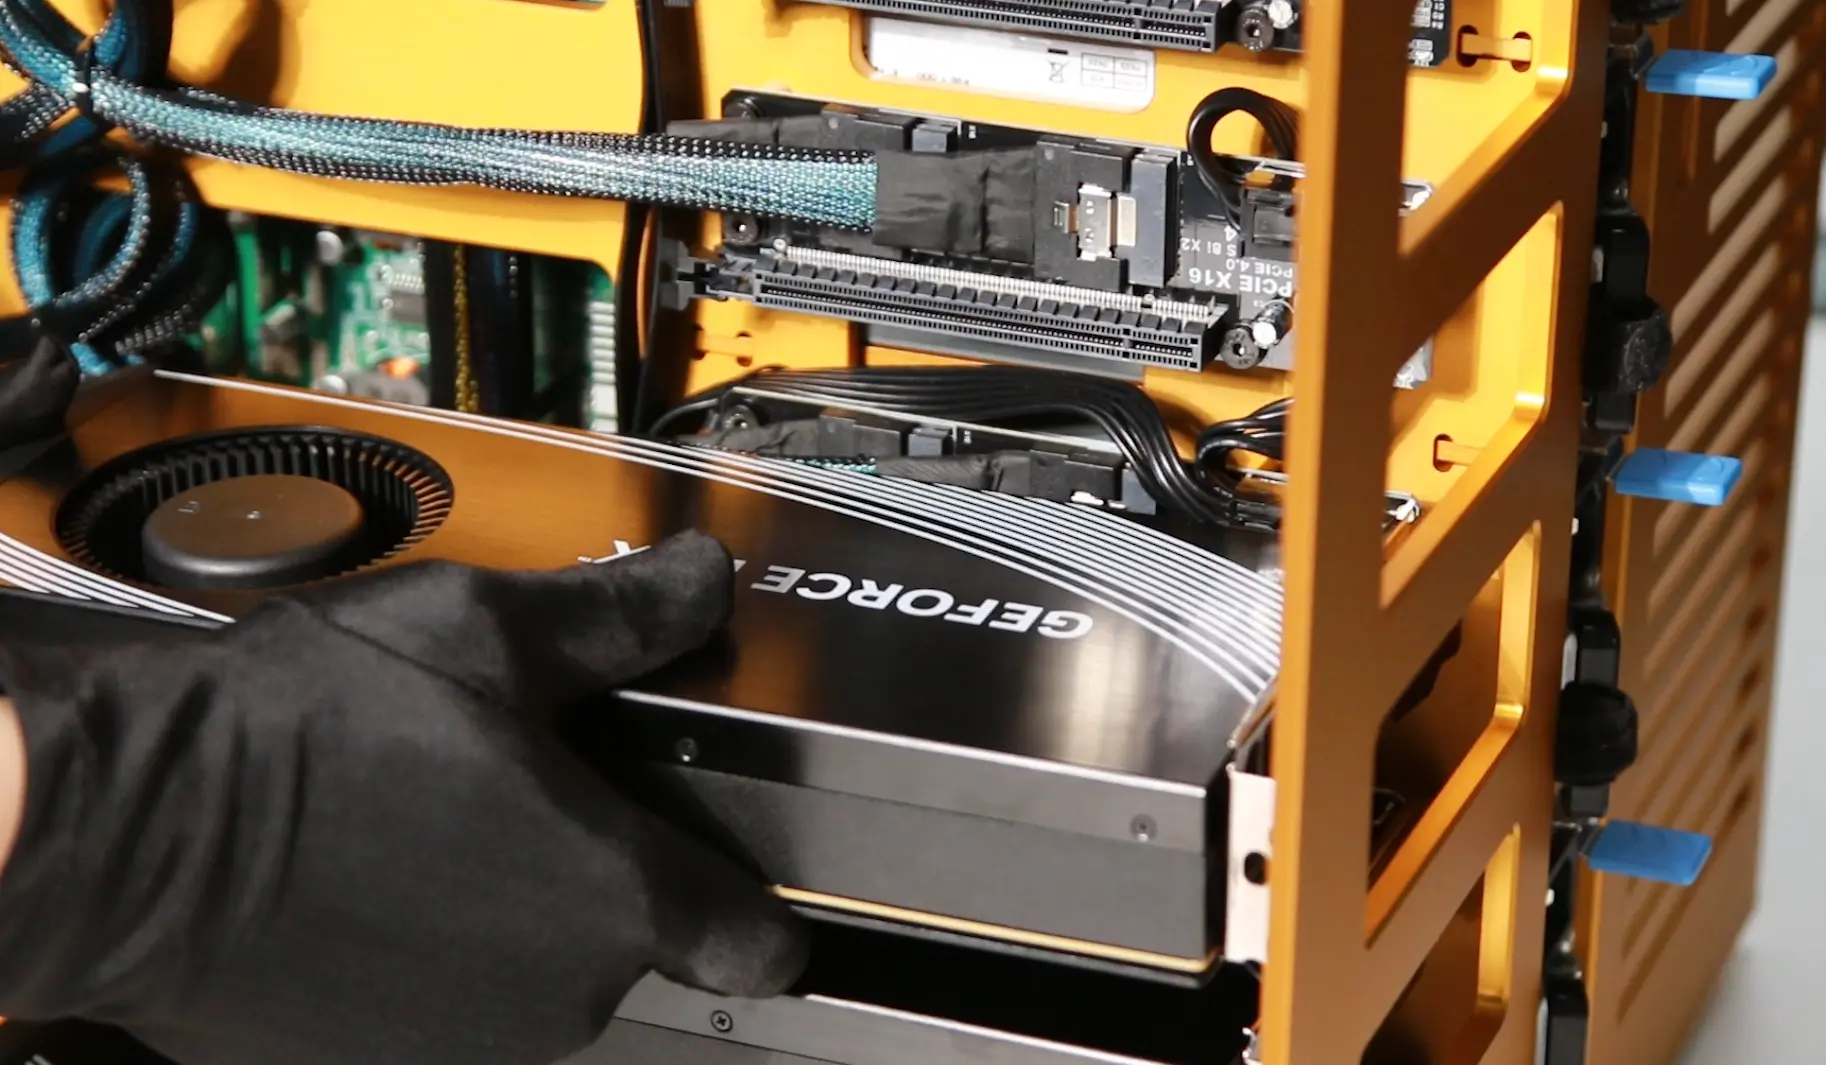
No traditional PCIe slots on this board. Sixteen MCIO connectors bifurcated through adapter cards to eight full x16 GPU slots. That's the whole point. Eight cards, eight full x16 connections, no PCIe switch, no compromises.
4090D over 4090 / 5090. Same form factor, same 24GB VRAM as the standard 4090. Reduced FP16 compute compared to the export-unrestricted parts, which barely matters for inference workloads where memory bandwidth and capacity dominate. The 5090 is the natural upgrade when you can find them, 32GB GDDR7 and a higher TDP, but supply is intermittent. The 4090D is what we could buy this quarter.

Four PSUs on a distribution board, not two. Redundancy. If one PSU fails on a 24/7 production box, you keep running on three while replacing the fourth. The PSU board centralizes power distribution to the motherboard, GPU cables, and fans, cleaner than splicing four ATX cables straight to the board.
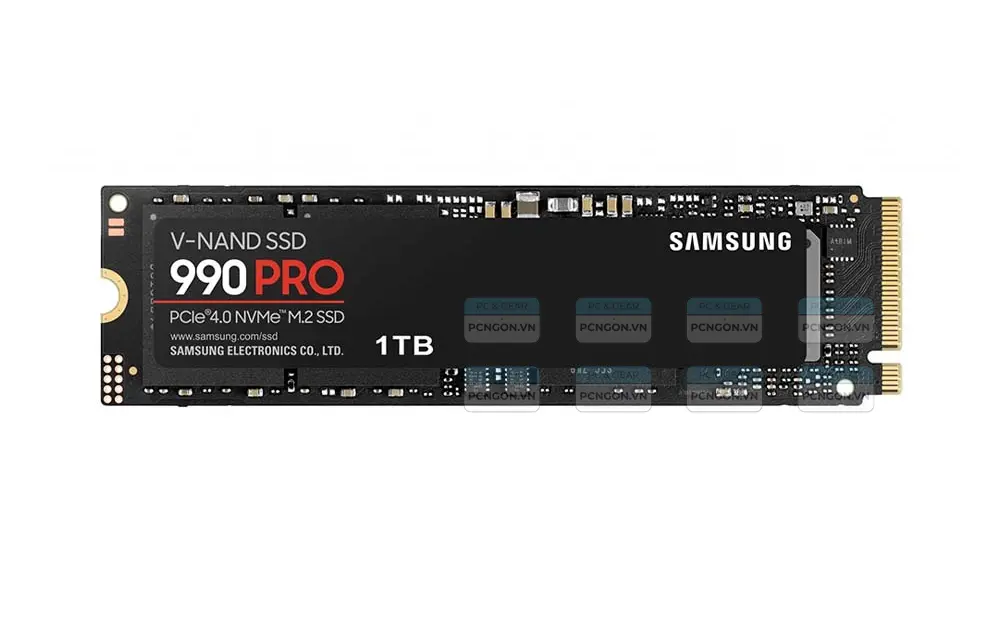
1TB boot is the baseline, not the ceiling. The default build ships with a single 1TB NVMe, enough to host any model up to ~400B parameters comfortably (Qwen3-72B, Llama 3.3 70B, DeepSeek-V3 quantized). To host frontier-scale open weights like Kimi K2 (1.1TB) or to keep three models hot simultaneously, expand to 3–4TB across the M.2 slots before first boot. Storage upgrades are the cheapest part of this build.
Assembly
The chassis is built from numbered laser-cut parts. Part 1 is the GPU Plate. Part 2 is the CPU Plate. Parts 4, 5, 6 are Back, Bottom, Top. Parts 7 and 8 are the side panels. Part 10 is the PSU Mount.
SP5 socket retention has a 14 in-lb torque spec in a specific star pattern. Use the torque driver. Cross-thread an SP5 socket and you're buying a new motherboard.
The MCIO cables are the trap. Each adapter card has two MCIO connectors on the board side and one PCIe Gen5 x16 slot on the GPU side. Eight adapters, sixteen cables. The cables look symmetric. They are not. There's a host end and a device end, marked by a small embossed triangle on the connector shell.
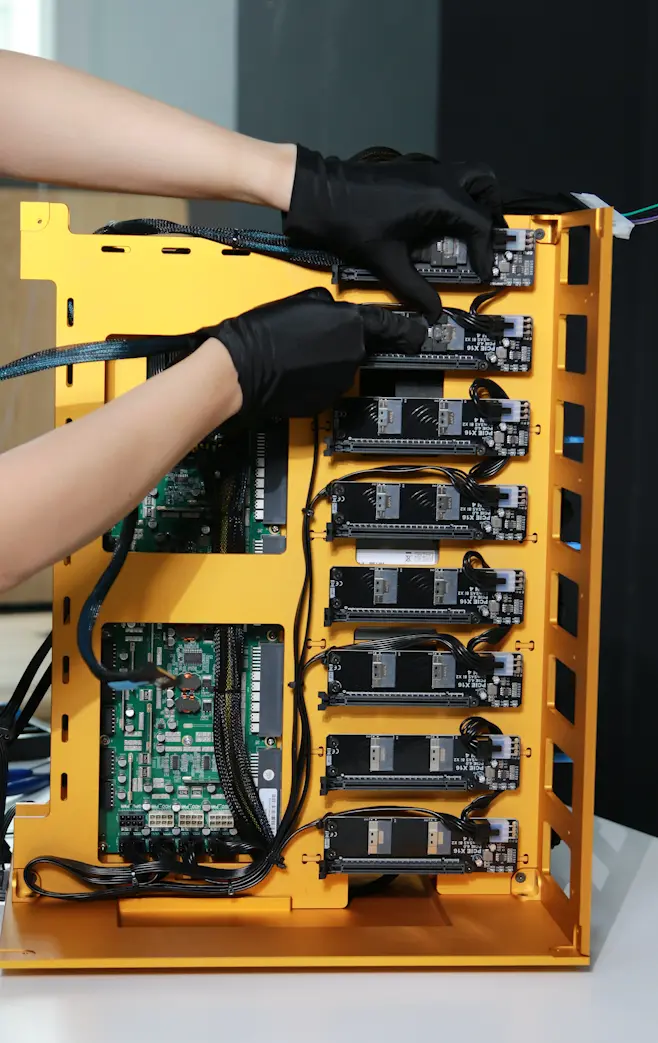
I plugged six in correctly and two rotated 180° on the first build. Symptom: those two GPUs enumerated at PCIe Gen1 x4 instead of Gen5 x16. System stable, GPUs visible, inference throughput on those two cards ~10% of the others. Spent two hours suspecting the GPUs before reading the manual properly.
Confirm cable orientation at both ends before you mount the GPUs over the adapters. Once the cards are in, you can't see the MCIO end.
Seat the GPU power connectors fully. The 4090D draws up to 425W through a single 600W cable; partial seating is the documented failure mode that melts connectors. Push until it clicks before you mount the card, the bracket hides the connector once installed.
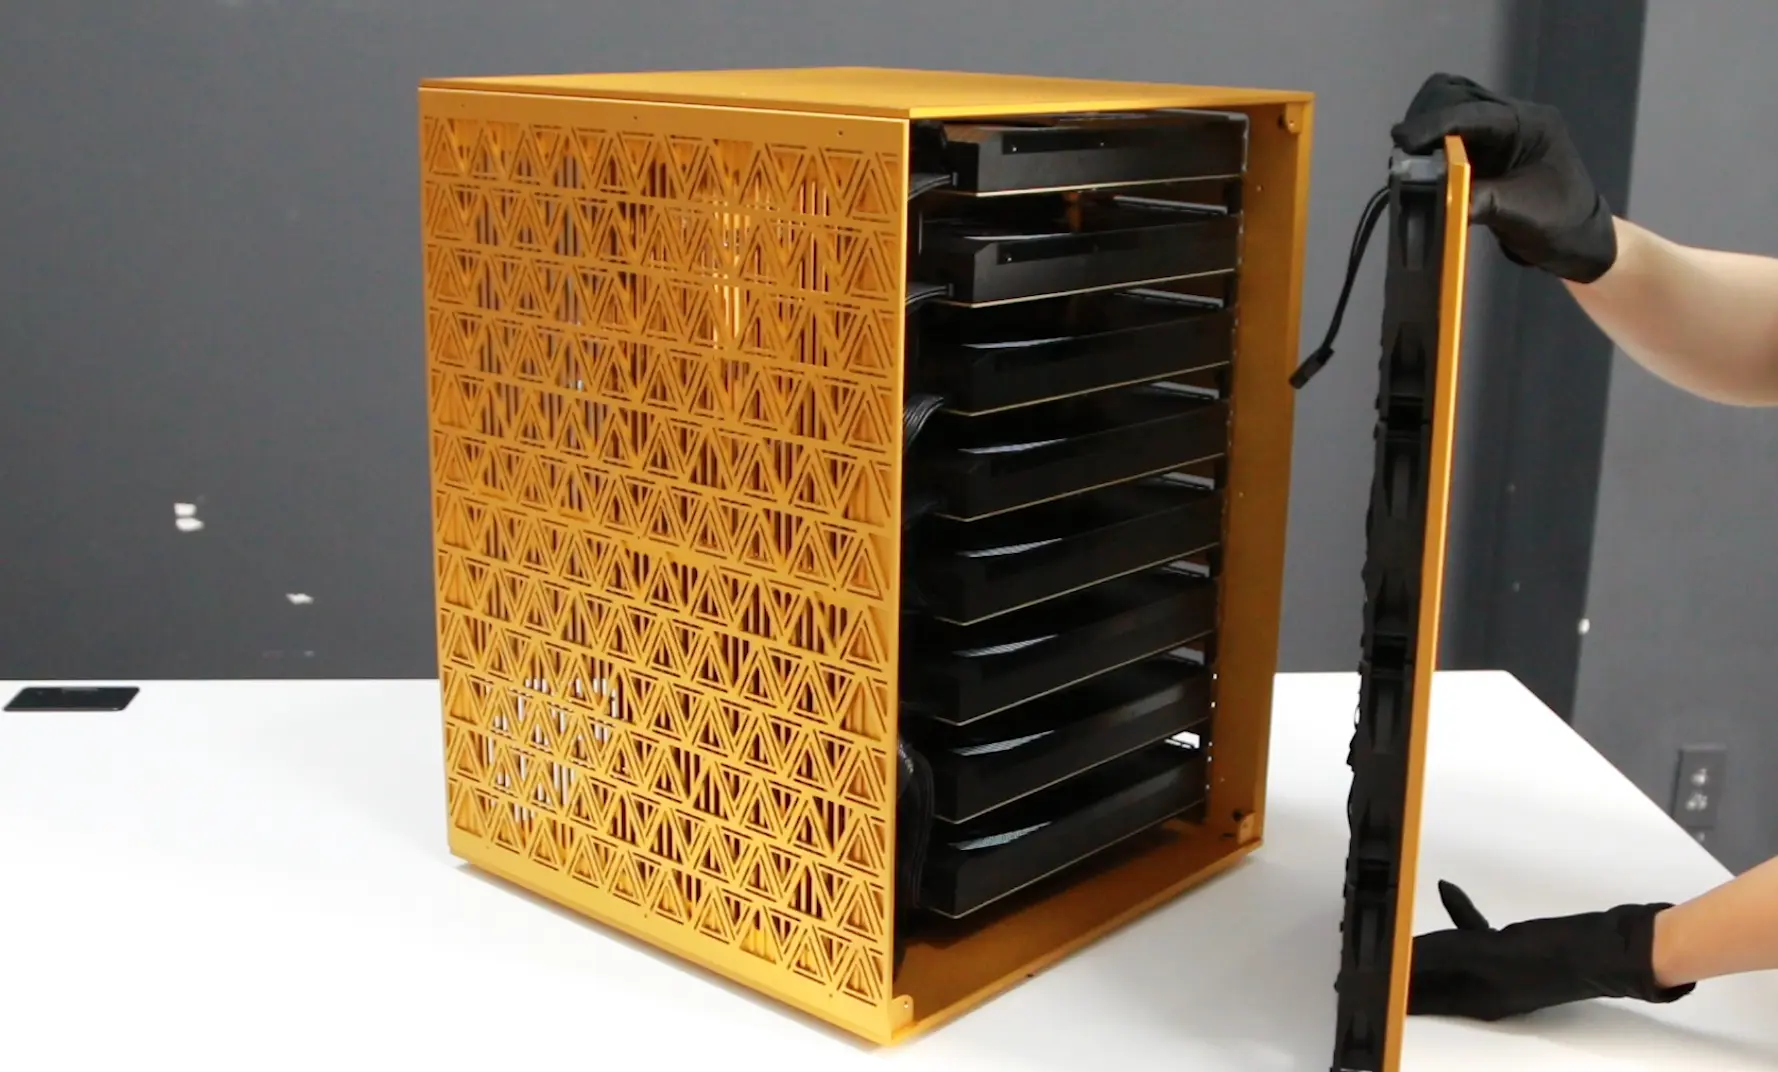
Connect the fan board cable, secure the sides and your rig is ready for setting up.
Quick Test
Flip four PSU switches. Push the chassis power. BMC LED goes amber for ~30 seconds then green. EPYCs spin up. GPUs initialize one at a time. POST in 45 seconds. If any GPU fan stays at 100% after the others settle, that card didn't initialize. Power down, re-seat MCIO and PCIe power. We had this on card 6 of the first build. In BIOS: UEFI boot, IOMMU on, Above 4G decoding on, PCIe Gen5 forced on all eight slots (board defaults to Auto which sometimes negotiates Gen4).
First Log On
The default BIOS settings on this board do not deliver the performance you paid for. Three settings have to change; three more are worth touching on a production box. Full reference in the repo (Docs/UM_motherboard.pdf, Docs/UM_BMC.pdf).
The three that matter:
- PCIe link width. Set every MCIO pair to x16. Path: Advanced → Chipset Configuration → PCIE link width → set MCIO2/1, MCIO4/3, MCIO6/5, MCIO8/7, MCIO12/11, MCIO14/13, MCIO16/15, MCIO18/17 to x16. The board defaults to Auto, which sometimes negotiates lower. Second place to look if a card under-performs after you've ruled out MCIO cable orientation.
- Above 4G Decoding. Usually enabled by default - verify. Without it, GPUs above 4GB BAR don't initialize.
- Resizable BAR. Path: Advanced → PCI Subsystems Settings → Enable Re-size BAR support. Real throughput gain on multi-GPU inference, especially prefill-heavy workloads.
The three that help:
- Power Management. Disable C-states and ASPM. They add wake latency at the start of inference batches.
- Memory Configuration. Set RAM to its rated speed; enable XMP/DOCP if your DIMMs support it. Defaults run conservative.
- Fan and Thermal Controls. The fan hub manages curves; the BIOS thermal limits gate it. Set limits aggressively.
Save and reboot.
Testing
Boot with WinPE from USB to verify hardware, or install Linux, NVIDIA drivers, and check with nvtop. Once confirmed, install your OS and start your AI work.
ROI Math
For a team running 100M tokens/day across Claude/GPT-equivalent capabilities:
- API spend at frontier rates: $30K–80K/month
- On-prem TCO including power (~7 kW × 24/7 × $0.12/kWh = $605/month), cooling, depreciation over 36 months: ~$3K–5K/month
- Payback: 4–10 months at high utilization, 6–18 months on hybrid workloads
The threshold I've watched companies hit: monthly API spend crosses ~$15K, this build starts to make sense. Below that, you're paying for hardware you don't need. Above that, you're renting compute you should own.
There's a non-financial dimension. Your customer data doesn't leave the box. Your fine-tunes don't sit on a vendor's storage. We've had two production incidents in 18 months where a major API provider went down and our on-prem box kept serving Autonomous Labs without interruption. The cost saving is real; sovereignty is the actual product.
Preliminary Conclusions
For those looking to host open frontier models on-premise, ~$80K in parts is the right end of the inference spectrum. A comparable Supermicro or Dell pre-built lands at $140K–180K.
There's a steep learning curve. Robotics in 2016 was for Linuxheads, not normal humans. AI infrastructure in 2026 is the same: narrower audience, similar depth. The documentation gap I felt unpacking the Deep Learning Robot in 2016 is the documentation gap people feel unpacking eight 5090s today. I've spent a lot of time on workshop floors building computers and chasing PCIe topology bugs to get devices that sort of work. This box works and lets you go straight to the hard problems which are multi-model serving, fine-tuning, sovereign deployment. If that sounds like your idea of fun, build it.
We're not selling this build. There's no part of it that's proprietary except the chassis CAD, and that's open-source in the repo.
Open Source
Full BOM with vendor links, chassis CAD, BIOS settings dump, vLLM configs, every gotcha that didn't fit this post: → https://github.com/autonomous-ai/Personal-AI-Server