

Everyone loves having a hobby that gives them some time to relax and explore their creative side better. Getting yourself a pottery studio space can be a great way to do so. If you have a cozy small studio apartment, you might be looking for some useful small pottery studio ideas and designing the best pottery studio layout.
We understand that you may find this task toilsome if you plan to do it yourself. However, it is quite rewarding if you do it right. Even the smallest of steps will lead you to the right path for creating your ideal tiny pottery studio. People who are short on space often think of getting a prefab studio shed where they can create a small pottery studio for themselves.
As you know, setting up a pottery studio in a small prefab cabin or your house won’t be difficult if you know the right ways of doing so, you must be mindful of the modern basic ideas for designing a pottery studio at home or in a cabin.
We can understand that you may have limited knowledge in this regard, especially if you are new to pottery. That’s why today we have shared all the right ways in which you can plan, design, and stylize your pottery studio to have the best results.
As you read on, you will find 10 small pottery studio ideas that you can try at home to push the boundaries of your creativity and get the best results.
1. Set Up a Well-Lit and Ventilated Workspace
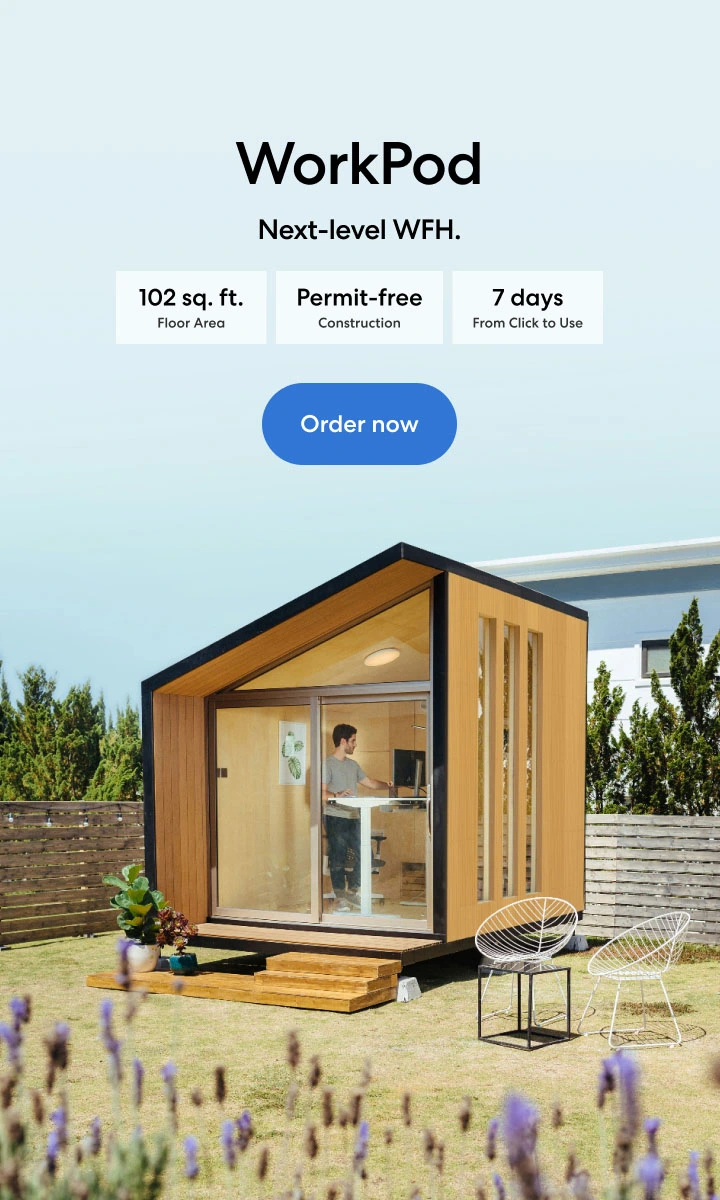
The first step to setting up a small pottery studio at home is to find a space that is dedicated to your craft. You may select a small room, a corner of a larger room, or even a small corner of your garage or basement for this purpose. People who live in small apartments may think of getting a privacy pod or a WorkPod Versatile as well. In simple words, a home office shed can serve as a potential pottery studio.
One thing to note here is that it is essential to choose a well-ventilated space with plenty of natural light. You will also want to make sure you have a flat, sturdy surface for your workbench and access to electricity for your pottery wheel and other tools. So, you must select a space where you can get all that.
2. Get Yourself the Right Tools and Equipment
Once you have a dedicated workspace for your tiny pottery studio, you will need to invest in the right tools and equipment to get started. This may include a pottery wheel, clay, glazes, tools for shaping and decorating clay, and a kiln for firing your pieces. You can purchase these items individually or invest in a starter kit that includes everything you need.
3. Set Up a Drying Area
It is important to have a designated area for your clay pieces to dry before you start shaping and decorating them. This can be a simple shelf or rack, or you can create a drying area using cardboard or foam board. Just make sure the area is well-ventilated and out of direct sunlight to prevent your clay from drying too quickly.
4. Create a Glaze Station
A glaze station is essential for applying and firing glazes onto your pottery pieces. You'll need a place to mix and store your glazes, as well as a way to apply them to your pieces. You can use a small table or shelf or even repurpose an old kitchen counter or sink. Make sure you have plenty of space to work and access electricity for your kiln.
5. Install Shelves to Store Your Tools and Equipment
It is important to keep your tools and equipment organized and in good condition. This will not only make your pottery studio more efficient, but it will also help to extend the lifespan of your tools. Consider investing in storage solutions for your small pottery studio layout such as shelves, bins, and drawers to keep everything in its place.
6. Set Up a Display Area
Once you start creating pottery pieces, you'll want to have a place to show them off. Set up a small display area in your pottery studio space where you can showcase your finished pieces. This can be a simple shelf or display case, or you can get creative and build your own display using wooden crates or other materials.
7. Incorporate Natural Elements
Adding natural elements to your pottery studio can create a calming and inspiring atmosphere. Consider incorporating plants, natural light, and other elements of nature into your workspace. Such natural elements will also enhance your productivity.
8. Select a Color Scheme to Create a Cohesive Look
Choosing a color scheme for your tiny pottery studio can help to create a cohesive look. You can use a single color or mix and match complementary colors to create a vibrant and lively atmosphere. Using vibrant colors can make your small pottery studio look spacious.
9. Incorporate Storage Solutions
In a small pottery studio, every inch of space counts. Consider incorporating storage solutions such as shelves, bins, and drawers to help you stay organized and make the most of your space. You may even need a table in this regard, so ensure that you have the dedicated space for all these accessories.
10. Personalize!
Finally, don't be afraid to add personal touches to your pottery studio. You can consider it one of the most useful small pottery studio ideas. You may hang your favorite artwork, display keepsakes, or add other decorative elements that reflect your personality and style. With a little bit of planning and creativity, you can create a small pottery studio at home or at a prefab ADU that is both functional and inspiring.


/https://storage.googleapis.com/s3-autonomous-upgrade-3/production/ecm/230914/bulk-order-sep-2023-720x1200-CTA-min.jpg)
Restez connecté avec nous !
Abonnez-vous à nos mises à jour hebdomadaires pour rester au courant de nos dernières innovations et de l'actualité de la communauté !
Intéressé par un placement de lien ?
Faire connaitre
/https://storage.googleapis.com/s3-autonomous-upgrade-3/static/upload/images/new_post_author/admin-1.png)