


Ultimate Guide To Proper Keyboard Hand Placement
Good typing posture begins with proper hand placement on the keyboard. It may seem like a small detail, but the way your hands rest and move across the keys affects your comfort, speed, and overall health.
With the right foundation, you can type more efficiently while avoiding strain on your wrists, arms, and shoulders. Whether you're working, gaming, or practicing touch typing, understanding this simple principle can make a lasting difference in how you work. This guide breaks down proper keyboard hand position step by step, helping you develop healthy habits and avoid common mistakes that lead to discomfort.
What Is Proper Hand Placement On A Keyboard?
Proper hand placement for typing is the foundation of comfortable, efficient typing. It involves positioning your hands in a way that keeps your wrists relaxed, your fingers naturally curved, and your movements balanced across the keys. Instead of forcing your hands into rigid angles, this posture allows them to follow their natural alignment — reducing strain and supporting fluid movement.
When practiced correctly, proper placement improves accuracy, minimizes fatigue, and helps prevent discomfort in your wrists, arms, and shoulders. Over time, it becomes second nature, letting you type faster and more comfortably without overthinking your movements.
Developing this foundation comes with practical benefits:
- Less physical strain: A neutral wrist angle allows your hands to move with minimal tension, lowering the risk of discomfort and overuse injuries.
- Better endurance: When your hands and arms are aligned correctly, it’s easier to type for long stretches without feeling sore or tired.
- Greater precision: With every finger assigned to a specific set of keys, your typing becomes more consistent and controlled.
- Long-term posture support: Proper keyboard hand position naturally aligns your arms and shoulders, contributing to an overall healthier desk posture.

Step-by-Step Guide To Proper Hand Placement
Once you understand what proper typing hand placement means, the next step is learning how to position your hands and wrists in practice. A few simple adjustments to posture and keyboard setup can make a lasting difference in how comfortably and efficiently you type.
- Step 1: Sit in a neutral, ergonomic posture
Start by ensuring your body is properly aligned. Sit upright with your back supported, shoulders relaxed, and feet flat on the floor. Your elbows should form roughly a 90-degree angle, allowing your forearms to hover comfortably above the desk height.
This alignment keeps your hands and wrists naturally positioned with the keyboard, reducing unnecessary strain from the very beginning. Good posture for sitting at a desk also supports better breathing, keeping you more energized during long work sessions.
- Step 2: Align your keyboard and desk height
Your keyboard should be positioned slightly below elbow level so your wrists remain straight and relaxed as you type. If the keyboard is too high, it forces your wrists to bend upward; if it’s too low, your shoulders may start to tense. A properly adjustable standing desk or keyboard tray makes a significant difference in how naturally your hands settle into position.
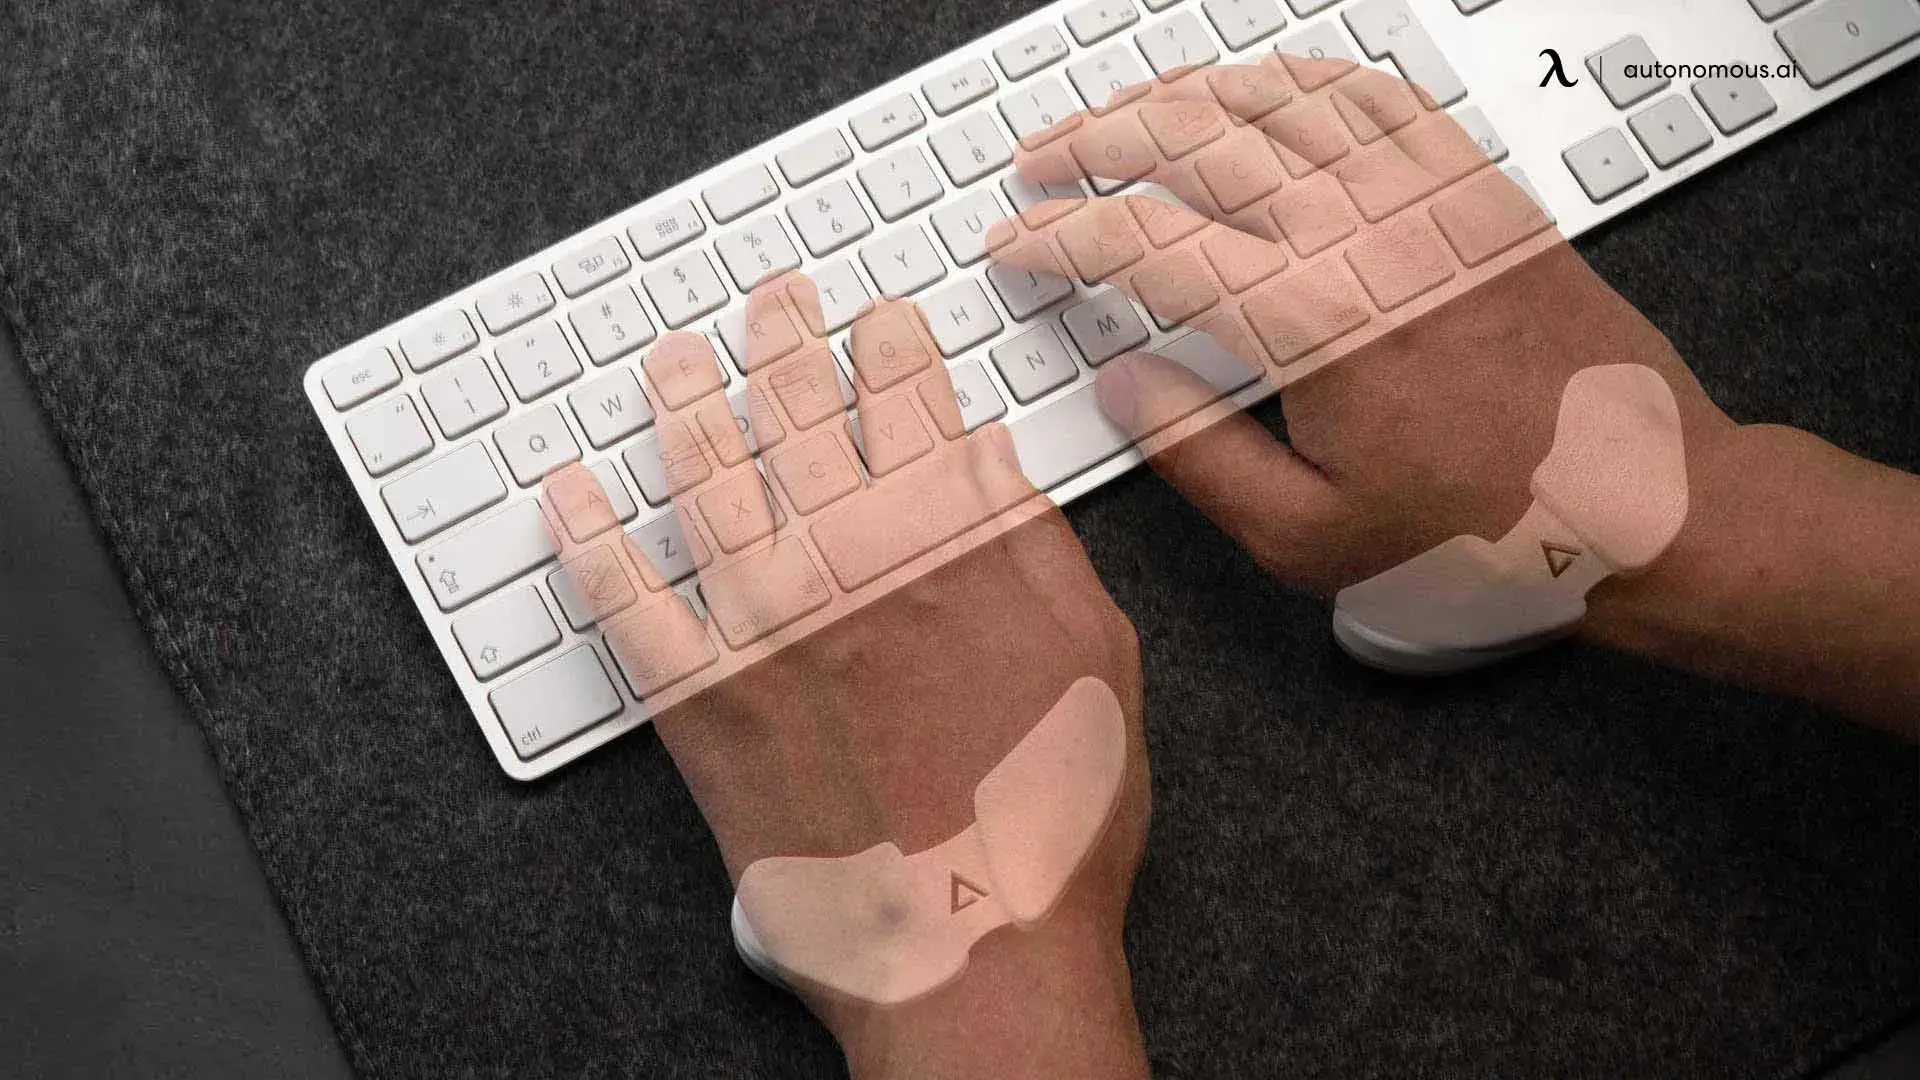
- Step 3: Place your fingers on the home row keys
The home row acts as your anchor. Rest the fingers of your left hand on A, S, D, and F, and the fingers of your right hand on J, K, L, and the semicolon. Your thumbs should hover gently over the spacebar. This gives each finger a natural starting point without any tension.
- Step 4: Keep wrists straight and relaxed
Your wrists should remain level with your forearms, not angled upward or downward. Let your hands float lightly over the keys rather than pressing your wrists into the desk. This neutral position allows for more fluid movement and helps reduce the risk of repetitive strain injuries over time.
- Step 5: Build finger movement muscle memory
Over time, your hands will learn to return to the home row automatically. Start by practicing slow, deliberate keystrokes to reinforce the connection between finger placement and movement. As your accuracy grows, your speed will follow naturally. This gradual approach creates lasting habits that feel effortless rather than forced.
Once you’ve found a comfortable and proper keyboard hand position, the next step is learning how each finger moves across the keys. This is where a keyboard placement chart becomes especially helpful.
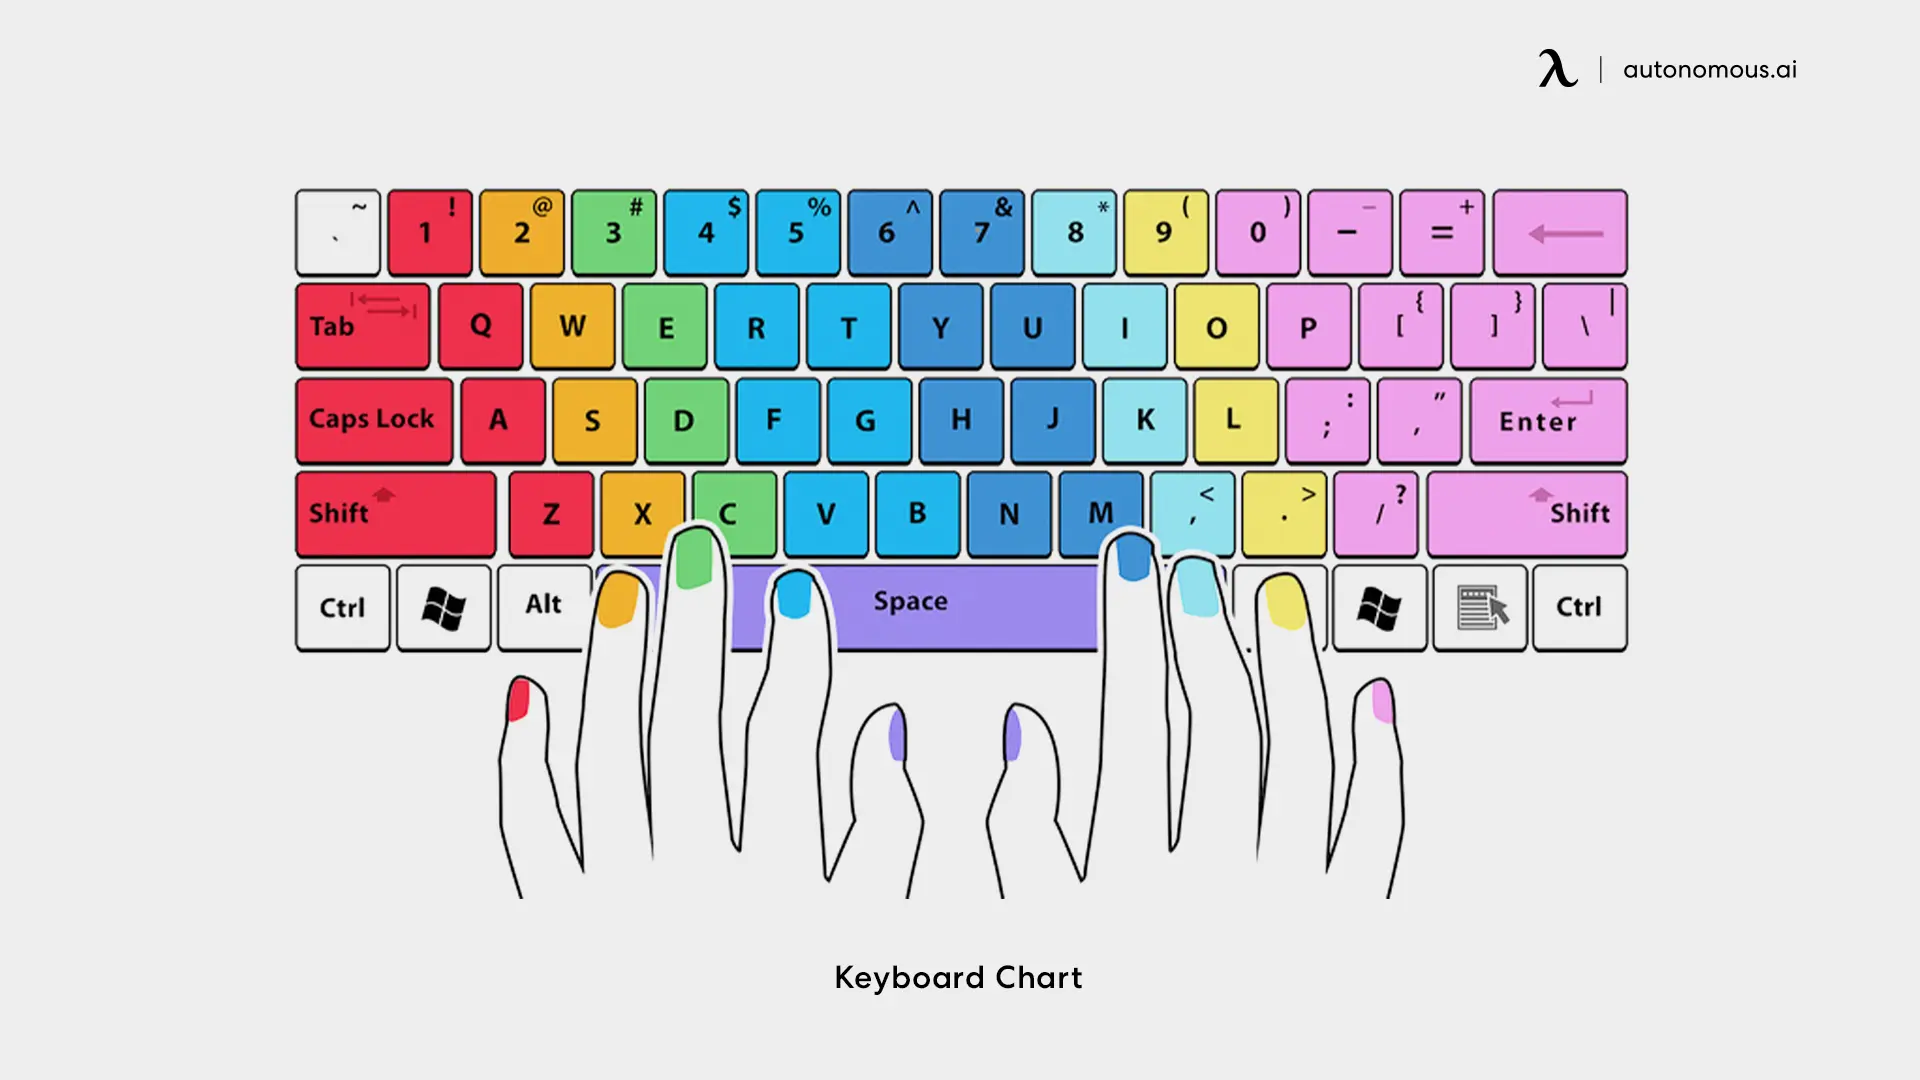
Keyboard Chart: Finger Placement Reference
After getting comfortable with your posture and basic hand positioning, understanding how your fingers map to specific keys is the next step toward smooth and efficient typing. A keyboard placement chart gives your hands a clear structure to follow. It eliminates guesswork, prevents awkward reaching, and helps build muscle memory that supports long-term comfort and speed.
Proper hand and finger positioning on the keyboard is essential for typing efficiency and reducing the risk of strain or injury. Here’s a comprehensive table to guide you on how to position your hands and fingers correctly on the keyboard:
| Finger | Home Row Key | Movement | Example Keys |
|---|---|---|---|
| Left Pinky | A | Moves up to Q, down to Z | Q, A, Z, Shift, Tab, Caps Lock |
| Left Ring | S | Moves up to W, down to X | W, S, X |
| Left Middle | D | Moves up to E, down to C | E, D, C |
| Left Index | F | Moves up to R and T, down to V and B | R, T, F, G, V, B |
| Left Thumb | Spacebar | Generally stays on the spacebar | Spacebar |
| Right Pinky | ; (semicolon) | Moves up to P, down to / | P, ;, /, Shift, Enter, Backspace |
| Right Ring | L | Moves up to O, down to . (period) | O, L, . |
| Right Middle | K | Moves up to I, down to , (comma) | I, K, , |
| Right Index | J | Moves up to U and Y, down to M and N | U, Y, J, H, M, N |
| Right Thumb | Spacebar | Generally stays on the spacebar | Spacebar |
1. Home Row Position
Left Hand: Place your pinky on A, ring finger on S, middle finger on D, index finger on F, and thumb on the spacebar.
Right Hand: Place your pinky on ; (semicolon), ring finger on L, middle finger on K, index finger on J, and thumb on the spacebar.
2. Finger Movements
Left Hand:
- Pinky: Moves to Q, Z, Shift, Tab, Caps Lock, and numbers (1, 2).
- Ring Finger: Moves to W and X.
- Middle Finger: Moves to E and C.
- Index Finger: Moves to R, T, V, B, G, H.
Right Hand:
- Pinky: Moves to P, /, Shift, Enter, Backspace, and numbers (9, 0).
- Ring Finger: Moves to O and . (period).
- Middle Finger: Moves to I and , (comma).
- Index Finger: Moves to U, Y, M, N, H.
3. Thumbs
Both thumbs rest on the spacebar and are used to press it, alternating naturally as needed.
The chart isn’t something to memorize all at once — it’s a practical reference. As your muscle memory develops, your fingers will naturally follow this pattern, making typing more precise, fluid, and sustainable over time.
Exercises To Improve Typing Technique
Improving your proper hand placement for typing isn’t just about speed — it’s about building accuracy, endurance, and comfort through consistent, mindful practice. Once you’ve learned the basics of proper hand placement on keyboard, regular exercises can help reinforce good habits and strengthen muscle memory. These simple drills don’t require special tools, just a bit of daily focus.
- Home row warm-up drills:
Start each session by lightly placing your fingers on the home row and slowly pressing each key in sequence. Move from left to right and back again. This helps your fingers settle into their natural positions and trains them to return to the home row automatically.
- Finger isolation practice:
Focusing on one finger at a time improves precision and coordination. Press the keys assigned to a single finger while keeping the others relaxed. For example, work through the keys for your left index finger (F, G, R, T, V, B) in slow, deliberate strokes. Repeat this for each finger to build even control.
- Rhythm and pacing exercises:
Instead of rushing for speed, try typing sentences or passages at a steady, comfortable rhythm. This builds consistency and makes your movements more fluid. Over time, this kind of controlled pacing naturally increases speed without forcing it.
- Accuracy-focused drills:
Practice short typing tests with the goal of minimizing errors rather than beating a timer. Correct hand movement and relaxed wrists are more valuable than fast but sloppy keystrokes. Slow and precise practice creates habits that last.
- Posture reset breaks:
Every 15–20 minutes, pause for a brief posture check. Relax your shoulders, straighten your wrists, and gently stretch your fingers. These small breaks keep your hands loose, improve blood flow, and prevent stiffness during longer typing sessions.
- Blind typing sessions:
Once you’re comfortable with basic hand placement on keyboard, close your eyes or look away from the keyboard as you type short sentences. This trains your hands to rely on muscle memory rather than visual cues, making your typing more automatic and efficient.

Ergonomic Tips for Typing Posture
Typing comfortably isn’t just about speed or technique — it’s also about supporting your body with the right posture and tools. A well-aligned setup helps protect your wrists, shoulders, and back from unnecessary strain while making your typing feel more natural and fluid. Here are key elements that work together to create a healthier, more ergonomic workstation.
- Maintain Correct Typing Alignment
The first thing to focus on when typing is maintaining neutral wrist alignment throughout your work. Your wrists ought to be parallel to and hovering above the keyboard. Make sure when your hands land on the keyboards, the wrists are straight but not planted on the desk surface. This subtle adjustment helps prevent tension and keeps your hand movements more fluid over time.

- Avoid Upward Keyboard Tilt
Many types of keyboards have back legs that angle the board upward, but this position forces the wrists into extension. A flat or slightly negative tilt is far better for ergonomics. It keeps your hands level with your forearms, supporting a more natural typing motion.
- Choose An Ergonomic Keyboard Design
The right keyboard can make a noticeable difference in comfort. Split ergonomic keyboards encourage a more open shoulder position, while low-profile models reduce wrist bending. Keyboards with gentle tilts and responsive keys help minimize force and tension during typing, and options like a quiet mechanical keyboard can offer a smoother, more comfortable typing experience with less noise.
- Enhance Comfort With Supportive Accessories
Office accessories like wrist rests and keyboard trays can help maintain a neutral typing angle without forcing your hands into awkward positions. These tools are meant to reduce pressure, not restrict movement. If you deal with existing wrist issues, a carpal tunnel keyboard or other medically designed ergonomic models can provide additional relief.
- Incorporate Movement Throughout The Day
Even the best posture won’t help if your body stays still for hours. Take short breaks to stretch your wrists, arms, and shoulders. Stand up, roll your shoulders, or do quick office chair exercises to encourage circulation. These brief movements help prevent stiffness and keep your posture from collapsing into less ergonomic habits over time.
- Keep Your Legs Flat And Grounded
Your lower body plays a quiet but important role in posture. Keep your feet flat on the floor or on a footrest, avoiding crossed legs or tucked feet. A grounded stance stabilizes your pelvis and spine, keeping your upper body naturally aligned.
- Position Your Arms For Relaxed Typing
Keep your arms close to your body with relaxed shoulders. If your elbows flare outward or your shoulders rise toward your ears, it’s a sign your keyboard or ergonomic chair might be off. A comfortable arm position encourages steady movement and less tension over time.
- Align Your Head And Screen
Your screen should be at or just below eye level so your neck stays in a neutral position. Avoid forward lean forward or tilting your head down for long periods. If you need to read from physical documents, place them on a stand at a similar height to reduce unnecessary bending or leaning.

FAQs
1. What is the correct hand position on a keyboard?
The correct hand position starts with your fingers resting lightly on the home row keys: A, S, D, and F for the left hand, and J, K, L, and the semicolon for the right. Both thumbs should hover gently over the spacebar. Wrists stay in a neutral position, hovering above the desk, without pressing down on any surface.
2. How do I improve my hand placement on the keyboard for beginners?
Start by keeping your fingers lightly on the home row (A-S-D-F / J-K-L-;) and wrists neutral above the desk. Practice slow, deliberate keystrokes to build muscle memory — over time, your fingers will naturally return to correct positions without conscious effort.
3. Can wrong hand placement on the keyboard cause wrist pain?
Yes. Incorrect hand placement — such as bent wrists, overreaching, or resting wrists on the desk — can contribute to strain on tendons and nerves over time. Maintaining neutral wrist alignment helps reduce the risk of discomfort or repetitive strain injuries.
4. What is the best hand position for fast typing on a keyboard?
The most efficient hand position aligns each finger with its home row key and allows minimal movement to reach others. This balanced setup keeps your hands relaxed and supports both accuracy and speed as muscle memory develops.
5. What is the proper hand positioning when playing the keyboard?
For computer keyboards, proper hand positioning means aligning your wrists with your forearms and keeping your fingers naturally curved over the keys. Each finger is responsible for specific keys, allowing you to type efficiently without overreaching or twisting your hands.
6. What is the proper wrist placement for a keyboard?
Your wrists should remain straight and level with your forearms, floating just above the keyboard surface. Avoid bending them upward or downward. This neutral position helps prevent strain and allows your fingers to move freely across the keys.
7. What is the correct posture for keyboarding?
Sit upright with your back supported, shoulders relaxed, and feet flat on the floor. Keep your elbows bent at about a 90-degree angle and close to your sides. Your keyboard should be slightly below elbow height to keep wrists neutral. Position your screen at or just below eye level to avoid hunching forward.
8. Which hand positions are recommended?
The recommended hand position uses the home row as your anchor point, with each finger assigned to specific keys. This structure supports efficient movement and helps build muscle memory. It also minimizes awkward reaching that can lead to fatigue or discomfort over time.
9. What is normal hand posture?
Normal hand posture means your hands are relaxed, wrists straight, and fingers gently curved. Your thumbs rest near the spacebar, and your shoulders remain loose. This natural position reduces tension and supports smooth, sustained typing.
10. Should my hands be level with the keyboard or slightly above when typing?
Your hands should hover just above the keyboard with wrists in a neutral line, rather than lying flat or pressing down. This floating position enables smoother finger motion and helps prevent putting pressure on sensitive wrist structures.

Conclusion
Good typing habits begin with proper hand placement on keyboard — a simple foundation that influences speed, comfort, and long-term health. By keeping your wrists neutral, aligning your fingers with the home row, and supporting your posture with the right desk setup, you create a typing environment that feels effortless rather than tiring.
As you practice, these adjustments become second nature, helping you work more efficiently and comfortably throughout the day. Whether you’re a beginner or someone refining your technique, paying attention to these small details can make a lasting difference in your overall productivity and well-being.