


Autonomous Hydrate AI
Build Your Own Smart Water Coaster: ESP32, Load Cell, PCB
A coaster that watches your cup so you don't have to think about water. ESP32, a single load cell, a 2-layer PCB, and a 0.6" body. The build log, the wiring, the mistakes.
A coaster that watches your cup so you don't have to think about water. USB-C powered, runs offline, fits a disc 3.54" wide and 0.6" thick.
Here's how to build one. Parts, wiring, firmware, dashboard.
Why a coaster
The first sketch was a smart bottle. We killed it in a week. My desk has a glass in the morning, a mug for coffee, a stainless bottle in the afternoon. A smart bottle replaces one and ignores the other two.
Put the brain under the cup instead. Whatever you set down, the coaster reads its weight. One sensor. One job.
The form factor decided everything
3.54" wide. 0.6" tall. Smaller than a hockey puck.
Every component came back to that constraint. No room for a Pi. No room for a stacked dev board. No room for through-hole anything. The body is what made this build hard, and what made it interesting.
Parts
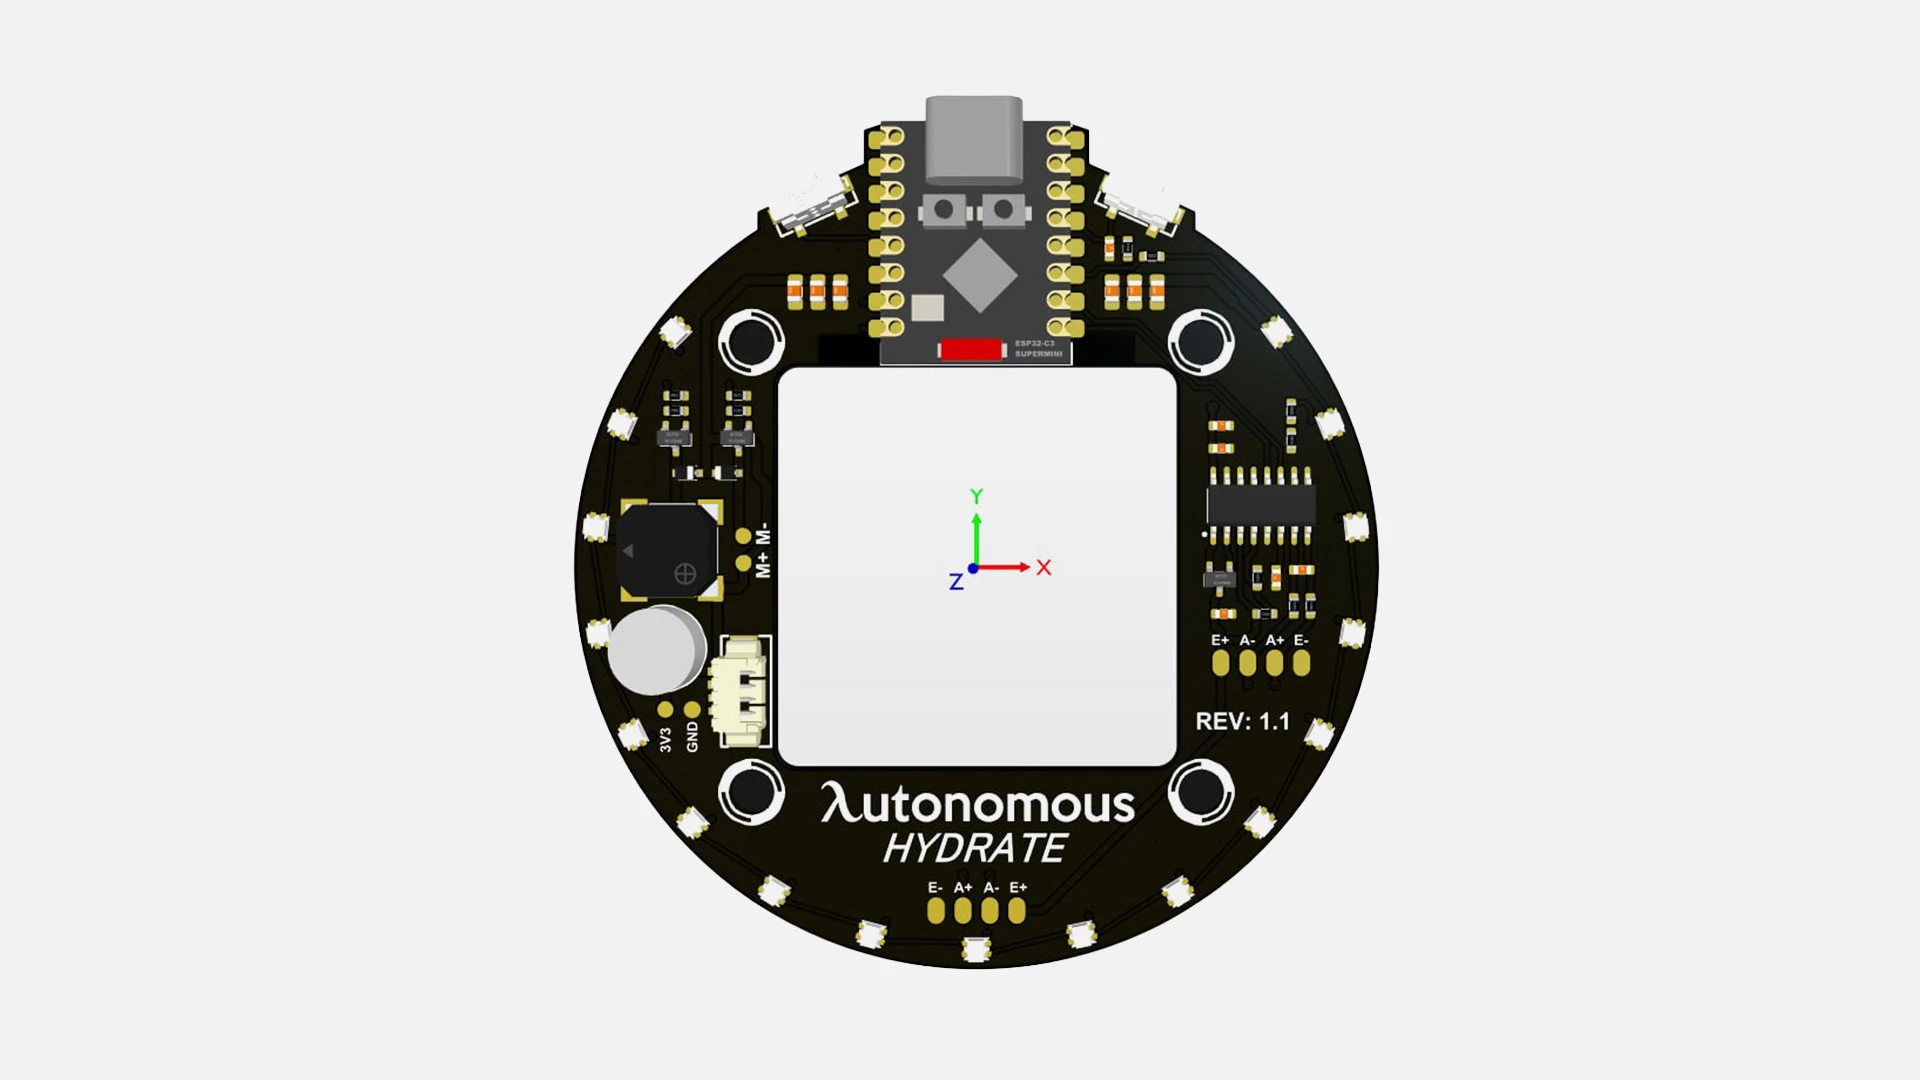
1. ESP32 SuperMini
Wi-Fi and BLE on a board the size of a coin. USB-C built in. We tried an ESP32-S3 dev board first. Twice as thick before we even added a sensor.
2. SC134 load cell
Strain gauge from kitchen scales. Single point, not four-corner. Four corners are more accurate but we'd lose another 4mm of height. Mounted off-center under a floating top plate. The plate flexes a few microns when a cup goes down. The gauge reads that flex.
3. HX711
24-bit ADC, made for load cells. We started with the ESP32's internal ADC because it was already there. 12-bit, noisy, false sips every few minutes. The HX711 fixed it in one session.
4. WS2812 ring
The main output. Addressable RGB, glows through a diffuser around the inner ring. We tried a single LED first. An on/off light can't say "I see you," "drink soon," and "you're behind" without a manual. Addressable solved it.
5. Vibration motor and piezo buzzer
The escalation path. LED first. If you've ignored it for an hour, the coaster taps your wrist next time you touch it. If you've ignored that, the buzzer. A device that pings you for fun gets unplugged. These earn the right to interrupt.
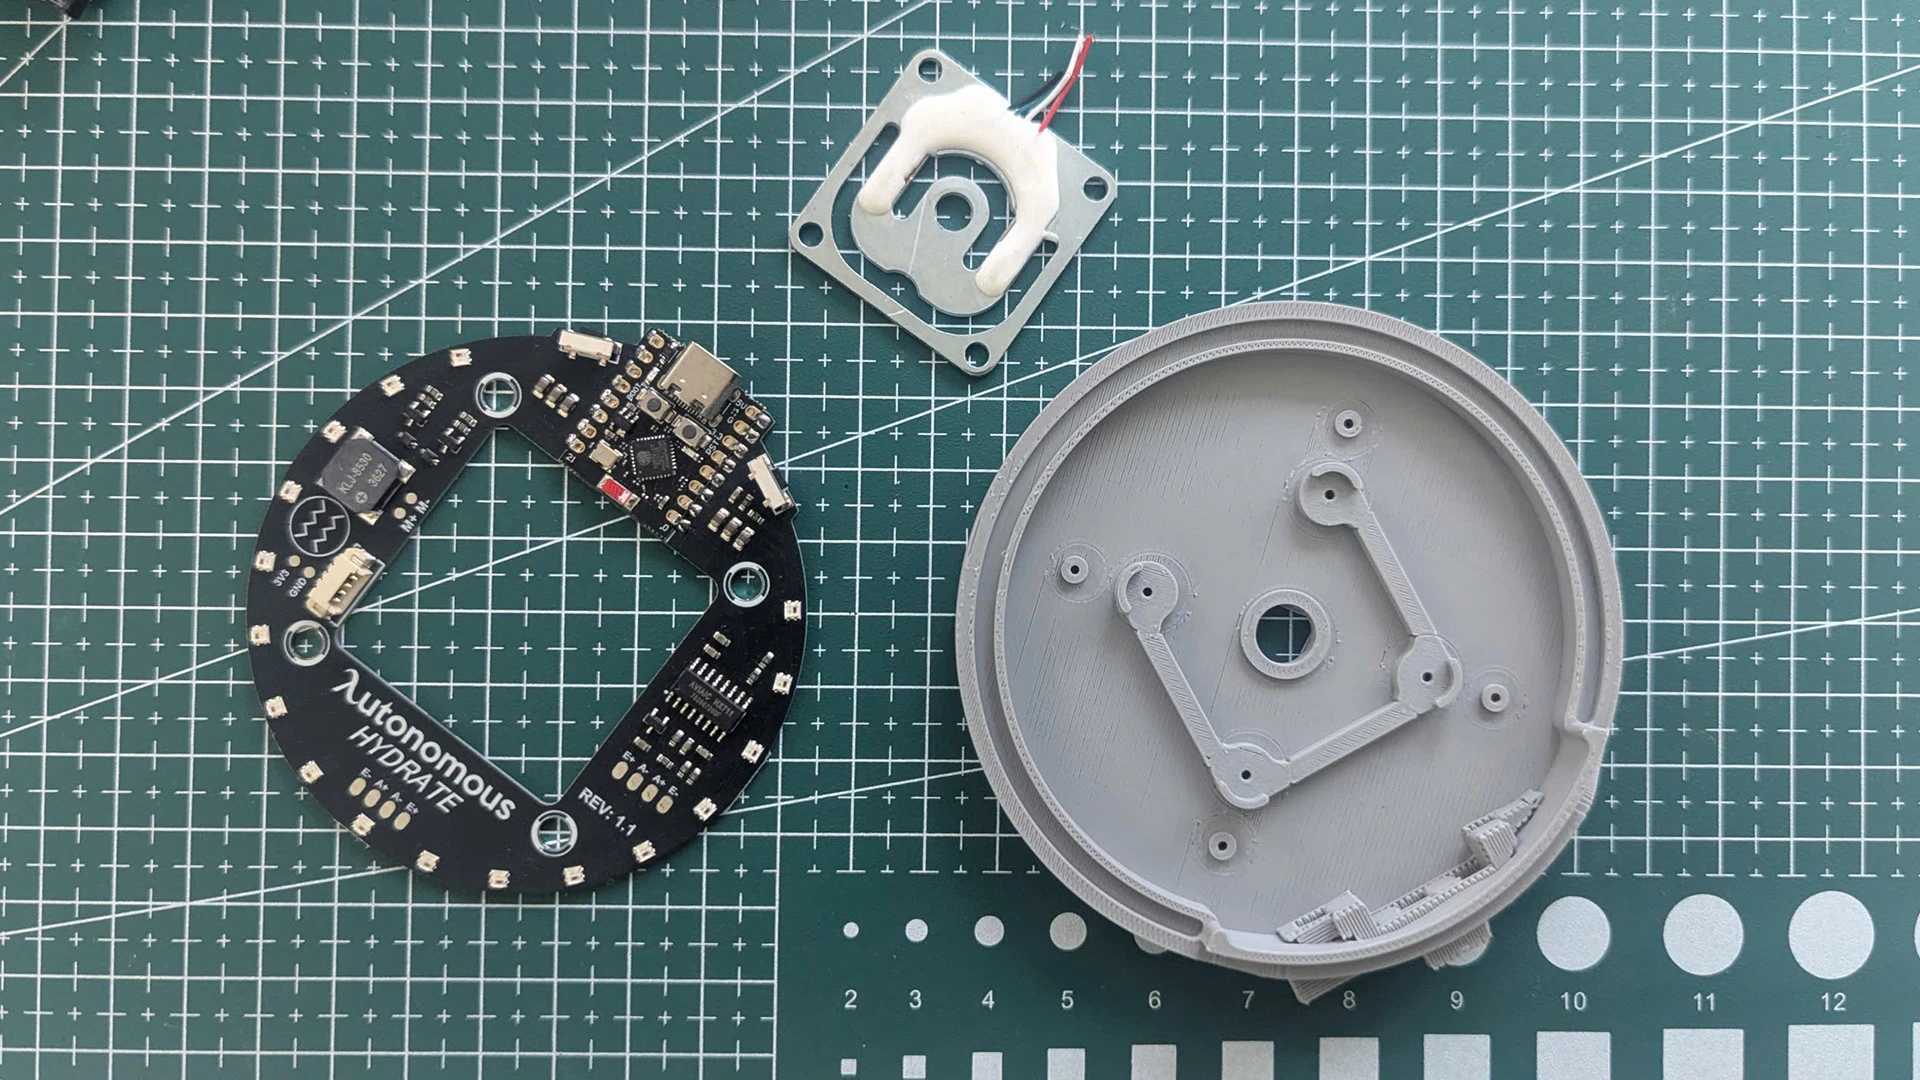
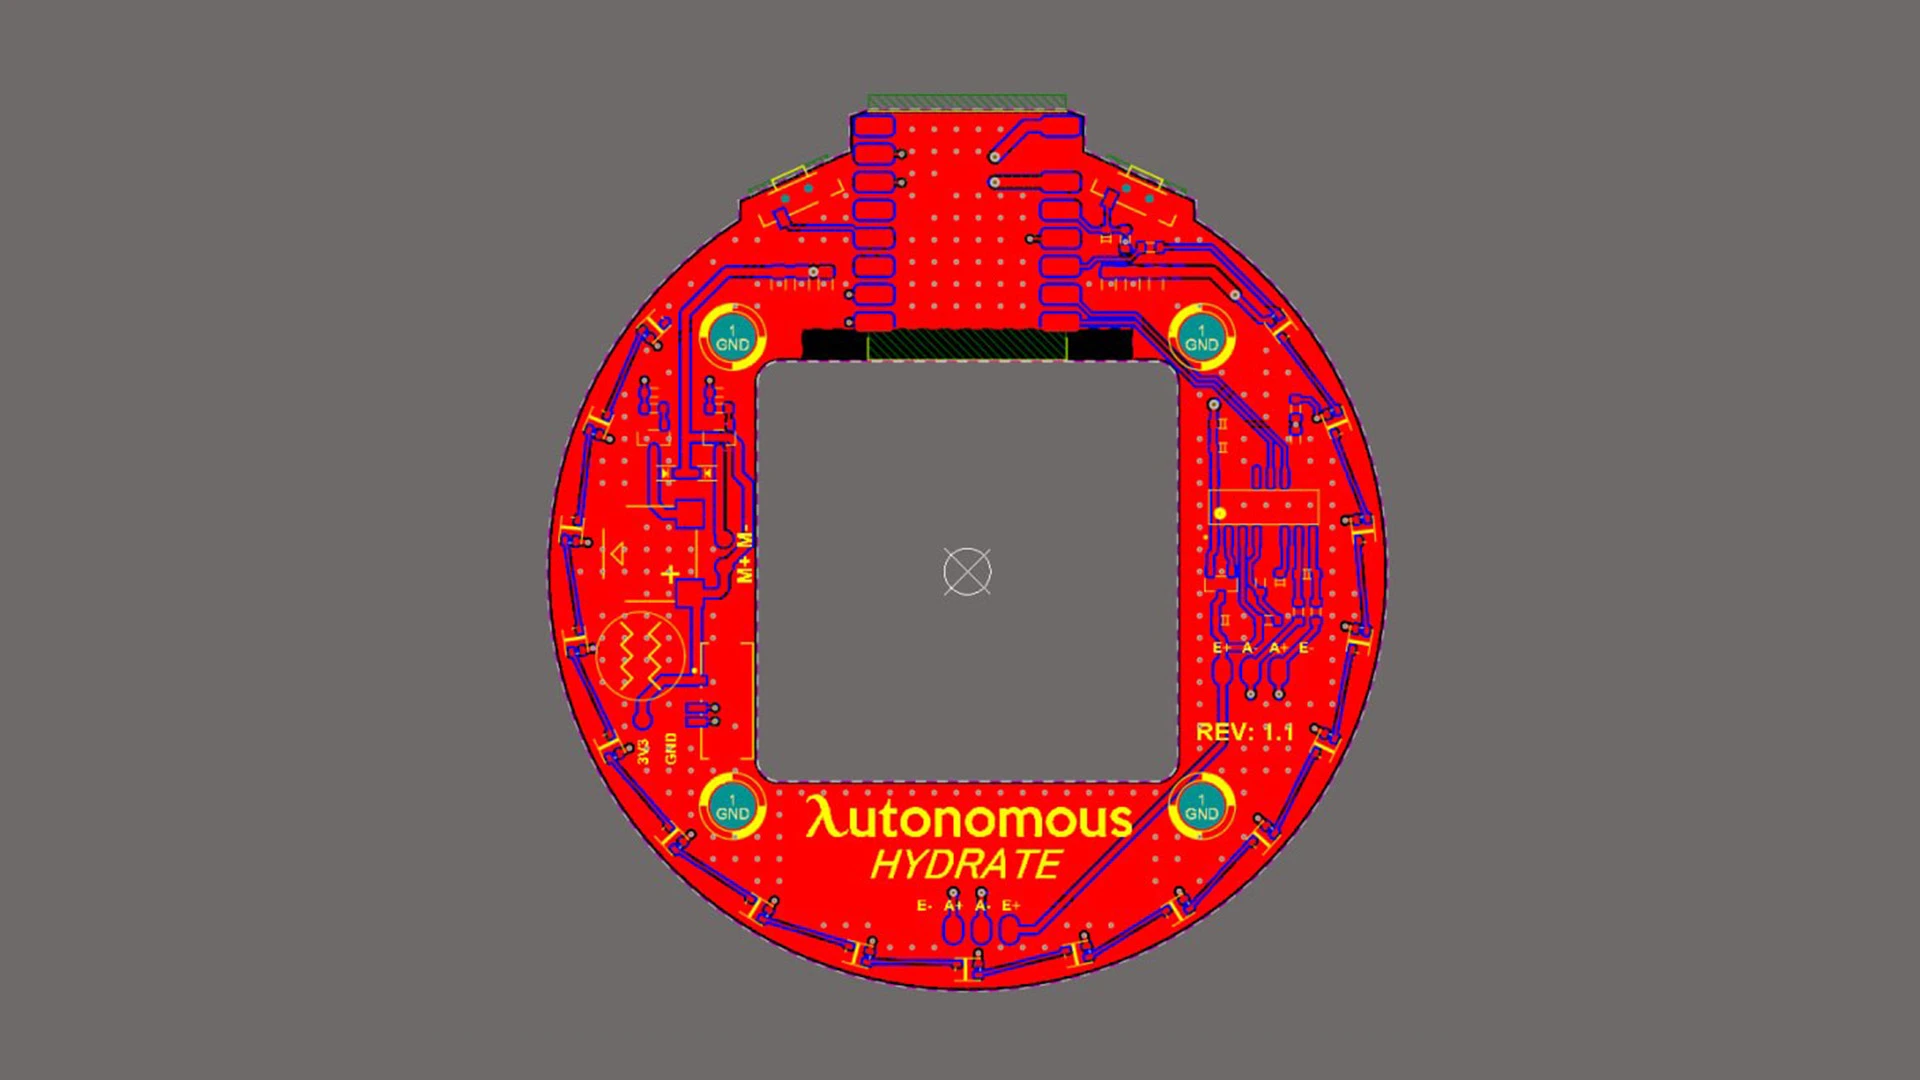
6. Custom 2-layer PCB
Protoboard was too thick. SMT everything. ESP32 SuperMini direct-soldered. JST-SH connectors for the load cell, LED ring, motor, buzzer. One ribbon out of the board, no flying wires.
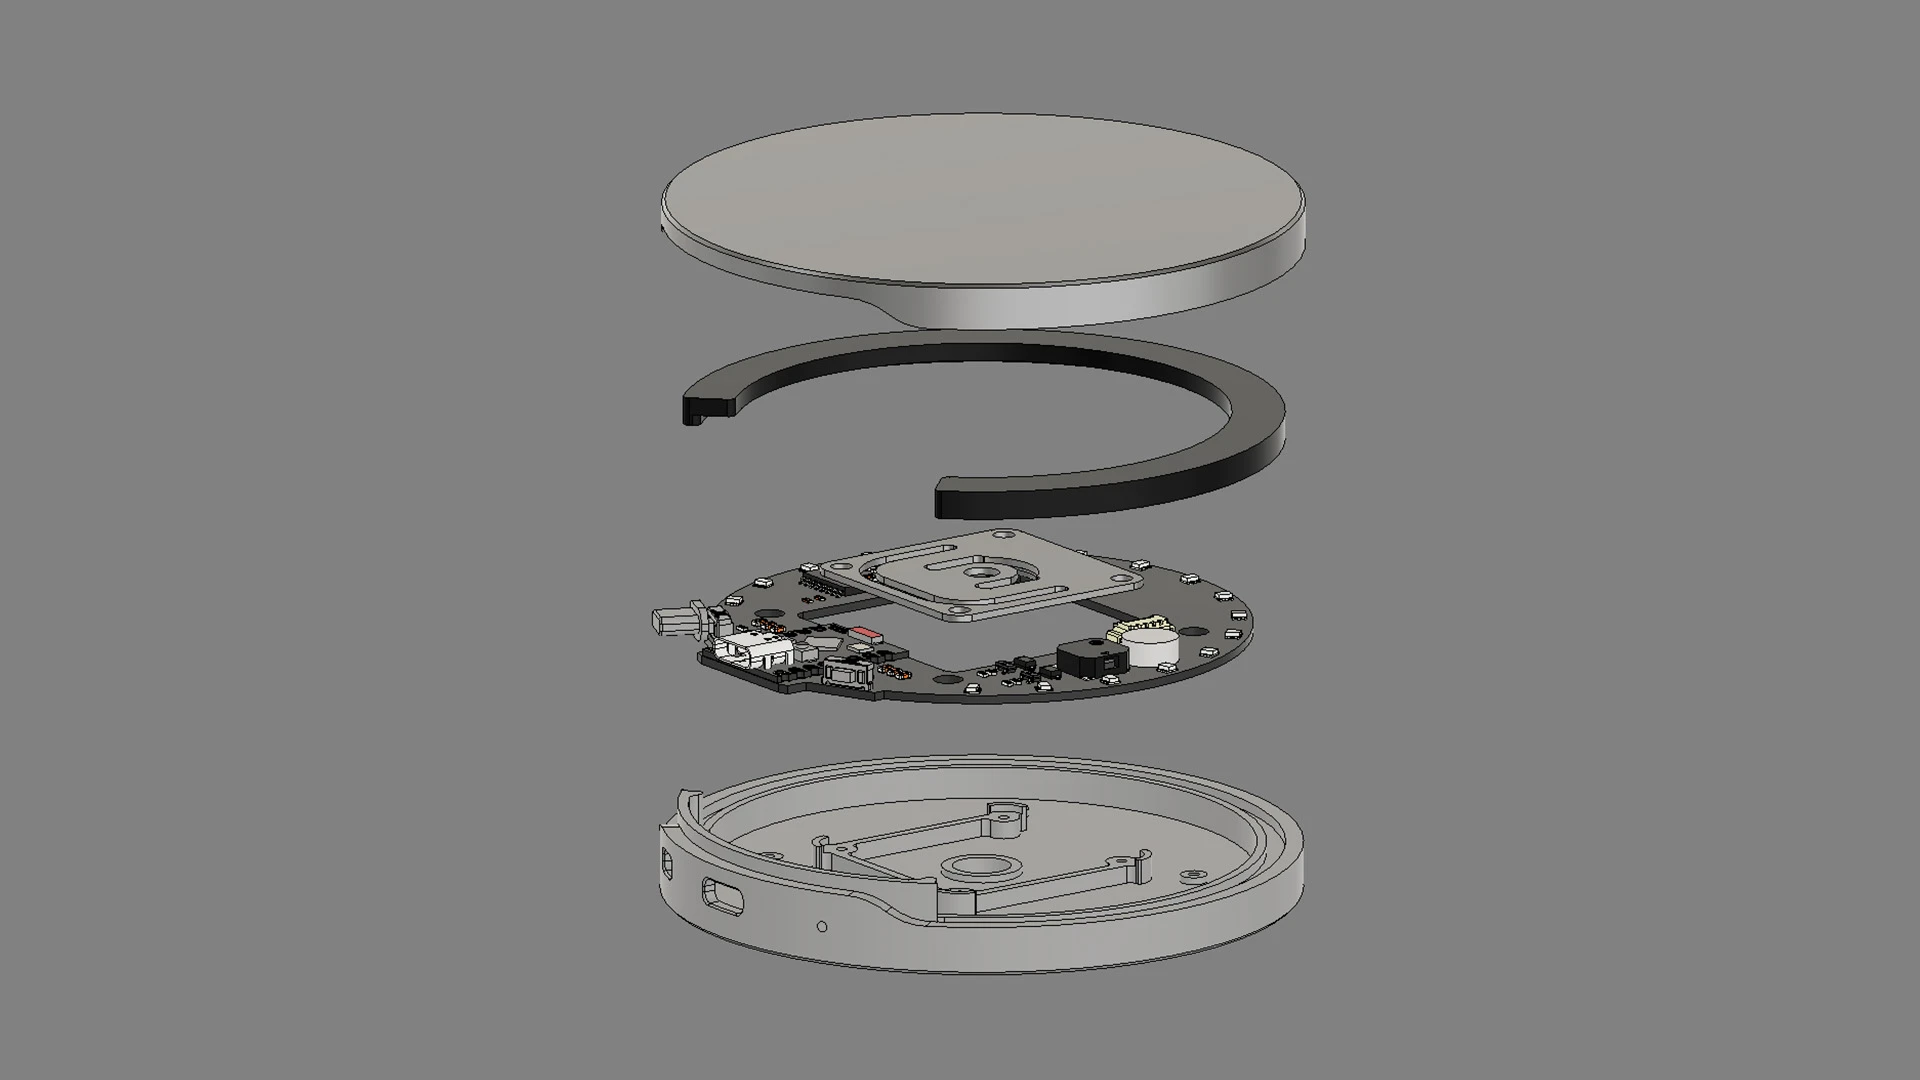
7. Body
3.54" disc, 0.6" tall. Top plate floats on the load cell. Bottom plate carries the electronics. USB-C port on the side.
Putting it together
1. Mount the load cell
The part everyone gets wrong on build one. SC134 has mounting holes on each end. One end fixes to the body base. The other end fixes to the floating top plate. The middle flexes. That flex is the signal. Bolt both ends to the same plate and the gauge reads zero forever.
We did this. Took an hour to figure out why nothing was working.
2. Wire the load cell to the HX711
Four wires: E+, E-, A+, A-. Manufacturers swap the wire colors constantly. Use the datasheet, not the colors. Burn this in.
3. Solder the ESP32 SuperMini
Direct to the PCB. No socket. Sockets add height we don't have. Reflashing happens over USB-C, the chip never has to come off.
4. Solder the HX711 inline
Sits right next to the SuperMini on the board. Surface-mount. Nothing tricky here, just don't bridge the pads.
5. Wire the LED ring
JST-SH 3-pin. 5V, GND, data to the SuperMini. Ring sits inside the top shell. Data flows in one direction around the ring. If half stays dark, flip the JST.
6. Wire the motor and buzzer
Vibration motor and piezo buzzer mount on the bottom plate. Each into its own JST header. Polarity matters on the motor. Get it backward and it just doesn't spin.
7. Close the body
Top plate floats on the load cell. Bottom plate carries the electronics. USB-C port lines up with the side cutout. Tighten in a cross pattern so the top plate seats flat. Uneven torque biases the gauge.
8. Calibrate
Every load cell ships with a different zero. The HX711 gives you raw counts, not grams. You have to teach it what a gram is.
Place a known weight on the top plate. We use 100g. Firmware reads the count, stores the gram-per-count offset. Now it knows what a sip looks like.
Skip this step and the device works. It just lies about everything.
The firmware
Hardware reads weight. Firmware decides what that weight means. Here's what's running on the ESP32.
1. Weight sensing
The HX711 is sampled every 100ms. Raw counts go through a moving average and a stability check before the rest of the code is allowed to look at them. Without filtering, a slammed laptop on the desk reads as a refill.
2. Event inference
A state machine watches the filtered weight and decides what just happened:
- Cup lifted
- Cup placed back
- Drink event (stable decrease)
- Refill event (stable increase)
Stability windows reject vibration. Thresholds reject noise. If the weight changes and doesn't settle, nothing fires.
3. Intake tracking
When a drink event confirms, the firmware does four things:
- Computes the amount from the before/after weight delta
- Adds it to today's total
- Updates the last-drink timestamp
- Publishes the event over MQTT
The total lives in memory and survives a soft reset. Hard reset and it's gone.
4. Reminders and escalation
If the last-drink timestamp gets too old, the reminder logic fires. Interval is configurable. Default is 30 minutes.
Escalation runs in order:
- LED ring effect
- Vibration motor
- Buzzer melody
Each stage waits before the next one triggers. If you pick up the cup mid-escalation, everything resets. The coaster doesn't punish you for being slow.
5. Daily goal and reset
Progress is tracked against a daily target. When you hit it, the LED ring plays a completion effect. Around 00:00:05, the daily total resets and a new day starts.
6. Connectivity
On boot, the device reads Wi-Fi credentials from EEPROM and connects. After Wi-Fi, it opens an MQTT connection and publishes status, config, and device info. The same connection receives commands.
Supported remote commands:
- Update config (target, interval, colors, vibration/buzzer settings)
- Trigger a reminder manually
- Push an OTA update
7. OTA updates
An OTA command carries a URL and a version string. The firmware compares versions, downloads the new image over HTTPS, writes it, reports progress, and reboots. If the download fails midway, the old firmware stays.
Using the device
1. Power on
Plug in USB-C. Place on a stable, flat surface. Wait for the startup effect to finish before placing a cup.
2. Place your cup
Put any container on top. The firmware establishes baseline weight from the first stable reading.
3. Drink
Lift, drink, place back. The firmware compares the stable weight before and after and logs the difference as intake.
4. Refill
Pour water in while the cup is on the coaster, or take it off, fill, and put it back. A stable increase is treated as a refill and the baseline updates.
5. Follow the feedback
LED shows state and progress. Vibration and buzzer fire only when you've been ignoring the LED. If you don't want the haptics or sound, turn them off in the app.
6. First-time Wi-Fi setup
Long-press the function button for about 5 seconds, then release. The device enters AP mode and broadcasts an SSID like Hydrate_XXXXXX. Connect from your phone, open the setup page, submit your Wi-Fi credentials. Device restarts and joins your network.
7. After setup
Device reconnects on every boot using the saved credentials. MQTT comes up automatically. Remote commands work as soon as the connection establishes.
The dashboard
The coaster runs offline. The dashboard is where everything it sees gets useful.
1. Real-time tracking
- Today's intake against your daily target, shown as a count (e.g. 838 / 2000 ml)
- 24-hour timeline bar chart, when you drank, how much each time
- Switch between daily and weekly views
- Pick any past date to see the history

2. Streak
Consecutive days hitting your target. We're prototyping a reward curve that scales with the streak, something like more tokens at 10 days than at 5, more at 30 than at 10. The shape isn't locked. The point is the same: built for long-term habit, not a one-day push.
3. AI hydration coach
This is the part the offline coaster can't do on its own.
The dashboard pulls your drink pattern (timing, frequency, volume) and combines it with live weather at your location (temperature, wind, humidity). From that, it tells you things like:
- You skipped the morning and drank everything after 6pm
- Cold day, you're under-drinking by 30%
- Tuesdays you forget more than other days
- Move your bottle into your eyeline during deep-work blocks
Written like a coach, not a notification. Specific, not generic.

4. Device config
Everything that lives on the coaster is editable from the dashboard:
- Reminder interval (default 30 minutes)
- LED colors
- Vibration and buzzer on/off
- Add and pair additional devices for multi-bottle or multi-user setups
- Full performance history
What it does
- Reads cup weight every 100ms
- Detects cup-on, cup-off, sips, refills
- Learns your rhythm locally
- LED, then vibration, then buzzer. Escalation, not spam.
- The coaster runs offline. Sync to dashboard is opt-in.
Operational notes
- Calibrate before you trust the numbers
- Avoid placing the coaster on a vibrating or sloped surface
- Recalibrate after any mechanical change or after moving the device
- Thresholds may need tuning for unusual containers (very heavy ceramic, very light paper cups)